Walleye and Fall, A Match Made in Heaven by Mike Bleech

How to Catch Fall Walleye
How to catch fall walleye - by Mike Bleech

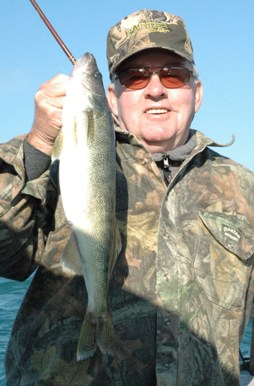
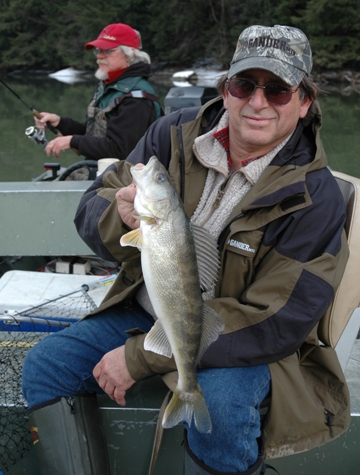
In summer the typical walleye in this pool is 14" - 16" long. During fall, this 19" walleye caught by Larry Snavely is about average.

Gone are the sweltering hot days of summer, replaced by frosty mornings, colorful hillsides, and hungry walleye. Life does not get much sweeter.

Anglers have been trying to explain the fall walleye phenomenon ever since they have been fishing for walleye.  Among the more common explanations, walleye are taking advantage of the last nice weather to store up energy for winter. 

Another, which alludes to the fact that larger female walleye seem to be more susceptible to anglers during fall, explains that walleye are putting on fat in preparation for the early spring spawn.

More likely is a mathematical explanation.  There is considerably less natural forage available during fall since walleye and other predators have been thinning bait fish numbers all summer when their metabolic rate is at its fastest.  This makes them more susceptible to anglers’ offerings.  Metabolisms are still high until at least mid-fall, but the food supply is minimal.

Very few of the things that happen in nature result from just one factor.  Combining with less natural food, walleye seem to be easier to find during fall.  Then, and this may be the best thing about the whole situation, walleye will settle into a location and stay there through winter.  As long as the weather allows, and as long as you can tolerate the weather, you can keep going back to the same hot spot for a few months.

This is more of a river pattern than it is a lake pattern, although walleye fishing tends to also be very good in lakes through fall.  It is a river pattern because throughout much of the best walleye range lakes freeze over at some point, leaving ice-fishing as the only type of fishing.  That is great fishing, however many walleye anglers would much rather hold a rod in their hands while sitting in a boat or walking along a river bank.

Dam Tailwaters – A Fall Hotspot

How to catch fall walleye - Terry Campbell

Terry Campbell is all smiles because this walleye has a date with a Havalon fillet knife.

Fall walleye hot spots tend to have gentle to moderate current.  Fighting current expends energy, and energy is harder to come by during fall.  This gets complicated, though, because the only way anglers can judge current is by looking at it from above the water.  That provides good clues, but it does not tell the entire story. 

The complicating factor is the effect that bottom composition has on current.  The rougher the bottom the more it tends to slow the current.  Demonstrations with dies shows that the current is deflected by friction with the bottom, not so much slowing it as it changes the direction of the current to swirls which lessen downstream push.  If that is a bit complicated, it is enough to know that rough bottom decreases downstream current.

For many years most of my winter walleye fishing took place at the Kinzua Dam tailwaters.  If you have a dam in your area check it out for walleye.  Even if the river or creek that is dammed is only a marginal walleye fishery, the dam might create a good fall and winter walleye fishery. 

The reason is that, like many fish, walleye make a general upstream movement during fall, then they are stopped by the dam and congregate below it if conditions are right.  They will stay there all winter.  The Kinzua tailwaters is one of the best trophy walleye hot spots in the East.  But during summer it is hard to catch a 15-inch ‘keeper’ there.

There are a couple of trout streams in my area dammed by flood control projects.  These creeks would not even be thought of as walleye fisheries if not for fall and winter fishing in the dam tailwaters.

Dam tailwaters may be the number one potential fall walleye hot spot.  Identifying others may be more difficult because they change from river to river based on available habitat.  An example, in a river that supports commercial navigation fall walleye hot spots might be on the protected sides of wing dams.  When walleye go on the feed, they most likely will be found along the edge of a current. We could not call this a universal pattern, though, since many rivers do not have wing dams.

Understand the Current Edge Factor

That current edge factor is a very common factor in fall walleye location.  Just about every river has current edges.  If not it is a lake, not a river.

Current edges are a common situation for shore-bound anglers because the edges often start immediately at the shoreline.  Typical locations for current edges are bends in the river, projections of land into the current, and man-made objects such as bridge abutments. 

A slight variation on the current edge occurs at the bottom of islands where two currents meet.  The edge between the currents may be swirling with less downstream velocity than the water on either side.

The last fall walleye outing my late friend Larry Snavley and I shared, along with our good friend Herb Wagner, focused on the upper mid-section of a pool in a medium-size river.  We approached the situation by slip-fishing, one nearly universal good river fishing tactic.  It is done by anchoring and fishing around the boat, then pulling the anchor until the boat drifts into fresh water and doing it all over again.  On that excellent day of fishing we hit walleye the second time we dropped the anchor to the bottom.  Each of us used a simple hook and split shot terminal rig, using chubs as bait.  We were fortunate to have good, lively chubs.

The pool had only mild current so we were able to fan-cast around the boat.  In faster current baits would swing quickly toward a position directly downstream from the stern, so we would have been effectively covering only a quartering downstream area, a cone shape.  In the mild current we could cover a half-moon shape.  We could even have cast upstream, but that had been covered from the first anchored position.

Fittingly, though of course we did not know it at the time, Snavley hit the first walleye, and ended up catching the most and the biggest walleye.  Neither Wagner nor I complained, there were plenty of walleye to go around and as usual we had lots of laughs.

Favorite Walleye Lures

How to catch fall walleye by Mike Bleech - stick bait

Stick baits can be very effective for walleye fishing during fall. Key is getting them down to the walleye.

Anglers who do a lot of fall walleye fishing tend to have favorite fishing methods, a certain bait, a certain rig, a certain lure.  Factor in that most anglers do this at only one close-to-home river, and it is easier to get by with just one method than in most other fishing situations. 

Anglers who suggest, even argue, that one method is the best everywhere obviously have not experienced many different rivers.

Maybe the simplest of all methods is casting stick baits.  Whenever I want to keep things simple and travel light I grab a small tackle box I have stocked specifically for river walleye fishing and a 7-foot, medium weight spinning rod.

The lures carefully chosen for my small tackle box include a couple of size 13 Rapala sticks, a couple of smaller stick baits with the fire tiger color pattern, a Rapala X-Rap which gets deeper than the other stick baits, white and yellow soft plastic jig bodies, and an assortment of jig heads, mostly 1/8 ounce.

Sure, I could think of several more very effective lures that would fill a much larger tackle box. But the idea here is keeping it light. Besides the rod and reel the only other fishing gear I carry is a rope stringer and a landing net.

Effective Presentations

In most fall walleye fishing situations, a slow, steady retrieve is most effective.  Occasionally twitching the lure may trigger a strike.

Using a simple hook and split shot rig allows the slowest bait presentation.  Sometimes it seems that walleye want to look at a bait a while before taking it into their mouths.  Yet the rig can be moved much more quickly, making this a very versatile rig.
How to catch fall walleye by Mike Bleech - chub bait

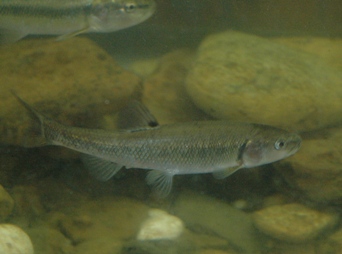
Make no mistake about it, some baits are better than others. Chubs such as this one are usually excellent, but it does vary by region.

Jigs, either tipped with bait or without bait, are used to the exclusion of all other lures and baits by many anglers. 

A jig that is tipped with a minnow offers the best of both artificial lures and baits.  It has the odor and taste of bait, and as long as the minnow remains lively it gives off the natural vibrations.  Then it also offers the color variation of artificial lures.

Color is sometimes a major attraction to walleye, maybe more so during fall than at any other time.  In stick baits my personal favorites are the standard black back, silver sides/white belly, and fire tiger.  White, yellow, chartreuse, and orange/brown have been productive plastic jig body colors.  Jig heads with eyes, usually a white dot with a black or red pupil, give most walleye anglers added confidence.

The next step is helping those walleye find their way to the dinner table. Walleye have a reputation as being the best eating fish in fresh water. True or not, you might as well find out for yourself.

8,475 total views, no views today
Posted in Guest Writers, Mike Bleech, Pike Fishing, Uncategorized, Walleye Fishing | Tagged , , , , , | Comments Off on Walleye and Fall, A Match Made in Heaven by Mike Bleech

A Havalon Knife Lost and a Lifetime of Memories Found

Mr.-Dupree-used-a-Havalon-knife-on-this-Yukon-Moose-

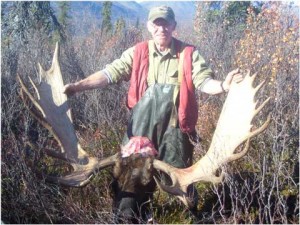
Mr. Dupee used a Havalon knife on this Yukon Moose

We received an email from Ron Dupee a while back telling us that he and his dad had a great hunting trip in the Yukon and each took a magnificent moose.  Only problem was that his dad lost his Piranta-Original during the hunt!   Well their story was so good and their pictures were so awesome, that the boss said we could go ahead and replace dad’s knife.  Luckily Ron had a Piranta-EDGE and he used it to process both moose as he relates below:

“I received my Havalon Piranta Edge skinning knife for Christmas 2009 and couldn’t wait to use it.  I failed on my attempt for a spring black bear and had to wait for our fall moose hunt.  I finally got my chance in the fall of 2010.  My dad and I both shot big moose here in Alaska.  I used my Piranta Edge to skin and cape out my moose, and for the majority of the quartering process, with only 2 blades.   I used 2 blades to skin and quarter my father’s moose.”

Ron-Dupree-and-his-Yukon-moose.

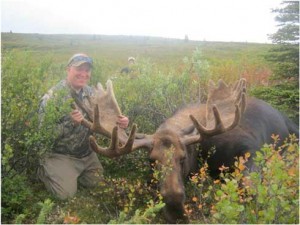
Ron Dupee and his Yukon moose.

“Having skinned and quartered over a dozen moose and caribou I can say without a doubt this is the best skinning knife I have ever owned.  It is simple to use and never goes dull.  There is no messing with stones or sharpeners, you just pop in a new razor sharp blade and you’re ready to go.  The blaze orange handle made it almost impossible to lose.  Thank you for the great product.  I look forward to years of future use.”

When we hear stories like that, it’s like Christmas coming early.  Thanks Ron and best wishes to you and your dad for many great hunts together in the future.

If you have a great Havalon story to share, please send it in to the editor@havalon.com with a photo or two.  We’ll do our best to share it here or on our website.

3,597 total views, no views today

Posted in Moose Hunting, Reviews of Havalon Knives, Skinning Knives, Uncategorized | Tagged , , , | 2 Comments

SoCal Bowhunter Reviews Havalon Knives

SoCal Bowhunter Header

A professional hunter reviews Havalon Knives for The SoCal Bowhunter.

I am very cautious when it comes to my gear, what I use and when…

Al Quackenbush, a pro-staffer for DIYbowhunter.com, reviews our knives after real world use in the field.  See the full review by clicking on the link:

http://socalbowhunter.blogspot.com/2010/10/product-review-havalon-piranta-edge.html

2,056 total views, no views today
Posted in Hunting & Fishing Equipment, Reviews of Havalon Knives, Uncategorized | Tagged , , , , | Comments Off on SoCal Bowhunter Reviews Havalon Knives

How to Map Trophy Bucks During The Rut by Brad Herndon

Mapping Tips for Deer Hunting Success

Deer hunting hotspot, a saddle, by Brad Herndon

A saddle is the hottest spot in the hills for a close range shot at a trophy buck.

It was November 7 as I climbed  the ladder to the hang-on stand in the large oak tree, one strategically grown in an inside corner. Just past 8:00 a.m. a button buck sprinted into the corner and looked nervously behind him. Something was up. Within minutes I saw the figure of a blocky deer in the brush. He stopped, looked around, then walked a few more steps; on he came.

Within a minute he was in my corner. He was old, that was obvious, probably 4 1/2 years of age. He wasn’t a high scoring deer, perhaps in the low 120s, but he had a good look to him and I knew I would be happy with this old warrior.

The buck paused to look over his surroundings once more, stopping in an opening among the trees. The sight pin rested just behind his shoulder and soon the arrow disappeared through the deer’s chest. He jumped sideways perhaps 10 yards and turned back toward me, wondering what had happened. Within seconds he attempted to go on, but within 40 yards slumped to the ground, giving up his life among the thousands of leaves that had fallen to the ground only a few days earlier.

This buck is one of many I have killed during the rut and each time I have connected by placing myself in hot travel corridors that bucks will use when out searching for estrous doe. The rut, by the way, will vary in some regions of our country, but normally the rut will run from November 7 to November 23, with the peak in most areas being November 10-20. Any time during the rut is a good time to hunt, but I am more successful on higher scoring bucks during the tail end of the rut, so you might keep that in mind. Now let’s see where the hot spots are located in which you need to place your stand.

Hunt The Inside Corners 

How to map trophy bucks, inside corners, by Brad Herndon

What in inside corner looks like on a topo map.

An inside corner is simply a corner notch in a flat woods or hilly region. When bucks are out traveling they will cut around these corners when going from one region of the timber to another because it is the shortest route. They will stay inside the timber, of course, in order to stay out of sight during daylight hours.

Typically inside corners are overlooked by most bow benders because they often contain only one trail, and scrapes and rubs may not be there, so it doesn’t look exciting. Incidentally, this is true of many hot choke points, so don’t let this discourage you.

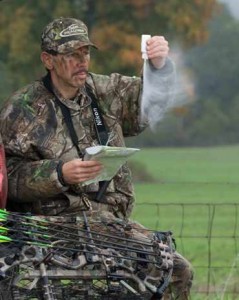
            Inside corners can be found visually if you are familiar with a region, but the best way to find them is by using both topographical and aerial maps. As always, be sure to check wind direction before hunting an inside corner. TV weather stations and Internet weather sites can give you wind directions, but by far the most accurate way to determine wind direction is by using a portable weather radio and carrying it with you.

How to map trophy deer hunting areas, wind check, by Brad Herndon

Always check wind direction before hunting any stand site.

Entry into an inside corner is usually excellent, such as through a farm field or pasture. Wait for the perfect wind to blow your scent back out into the field and you are in the driver’s seat for getting big bucks, believe me.

Key In On Flat Land Funnels

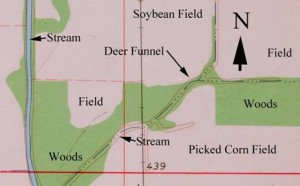
            Wide fencerows with trees that connect two tracts of timber in flat land areas are just flat out dynamite locations to place your tree stand because it chokes deer movement down to a narrow spot perfect for bow shots. By using the aerial and topo maps, these spots are easy to find. Also look for narrow strips of timber along streams that bucks will use as travel corridors. Swamps sometimes “bulge out” toward a nearby field and these can be hot spots as well. The tops of levees can also carry good deer movement during the rut.

            Many hunters wonder what the best time is to be on stand for success during the rut. I have killed good bucks both early in the morning and late in the evening, but the vast majority of the good bucks I have killed have occurred between the hours of 10:00 a.m. and 1:00 p.m. This occurs because bucks have been with does during the night, and by morning they are tuckered out. After snoozing a while, they are up and searching again, and this falls in that 10:00 a.m. time frame. 

How to map trophy deer, flat land funnels, by Brand Herndon

In flat land look for narrow spots that serve as travel corridors for bucks during the day.

Hunt the Hilly Hot Spots

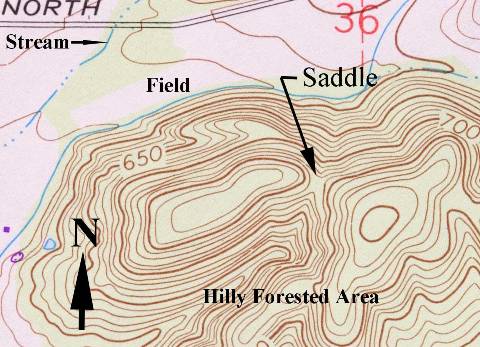
            While inside corners in the hills can certainly be a hot location in which to arrow the buck of a lifetime, it isn’t the best choke point in the hills. The saddle is, and saddles have really been good to me. Saddles are simply low spots in ridgelines. Because deer are lazy just like humans, they will use the saddle when out traveling because it is the easiest route from one valley bottom to another.

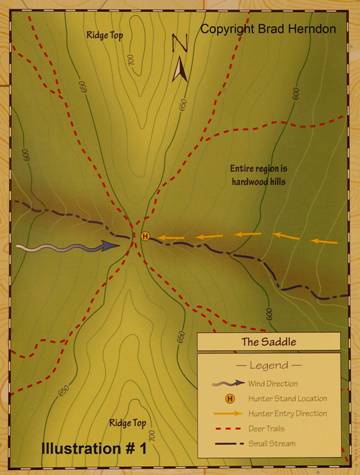
            Aerial maps are a picture from above so they don’t show saddles. The topographical map with elevation contour lines, meanwhile, graphically shows saddles in hilly regions, so that is the map to use.  Here’s a map showing how to effectively hunt a saddle.

How to map trophy deer, the saddle guide, by Brad Herndon

This illustration shows how to hunt saddles in order to be successful.

Another hilly location I have been successful in is what I call the hilltop field funnel. When a valley meanders up into the hills and starts climbing into the higher elevations, it sometimes will peter out at the top at a farm field or pasture. Oftentimes the location where this stream ends at the top a flat, narrow area is formed between the stream and the field or pasture. This is an incredibly productive spot for a tree stand, and the entry to the stand is ideal when coming through the field or pasture. You must, however, wait for the correct wind, and this takes patience.

            Another hot spot normally overlooked in the hills is the top of a pond or lake dam. Essentially the dam connects the two hillsides, so rather than go all the way down the hill and back up below the dam, moving bucks simply walk across the top of the dam. I know of two awesome dam funnels in a hilly region in a nearby county and they are rarely hunted by archers. Check them out in your area. 

Hunt the Break Lines—Where the Aerial Map Excels

            While topo maps have their easy-to-use contour lines that reveal saddles, hilltop field funnels, and other important topographical formations, they are a drawing, not a picture of the landscape. Being photographs, aerial maps show the actual streams, trees, bushes, fields, houses, roads and so forth. Because of this the aerial map will reveal the break line in a woods. As you will quickly recognize, the brushy areas and mature timber areas will look entirely different on the aerial map.

            Break lines are formed when one area of a woods is cut-over timber, but an adjacent area owned by someone else is not cut over. What we end up with in a few short years is a thick, brushy tract in the timbered area, and the adjacent woods being open and more mature.

            In these situations deer will bed in the thick area and spend time browsing on the abundant saplings found in the re-growth. The deer will also form several trails snaking in and out of this thicket, but most importantly they will form a trail running the length of the break line and it will be located within the open timber, not the brushy area. There will be a ton of scrapes found along this break-line trail.

            Both my wife Carol and I have successfully bow hunted break-line trails for over 35 years. We do well on them during the rut because when out traveling, bucks will travel the length of this break-line trail and simply scent check the deer trails coming in and out of the thicket to see if a hot doe has used one of them.

How to map trophy deer, by Brad Herndon with buck

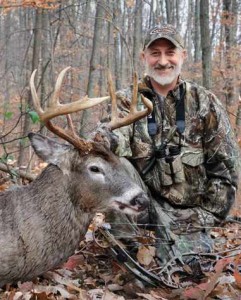
The author, Brad Herndon, with a 4-1/2 year old buck taken on an inside corner.

If hunting a break-line trail in a smaller tract of woods, stay near the edges of the woods in order to use the wind to your advantage. If  hunting a break-line in a large forest, you can more effectively hunt the break-line trail within the forest because bucks seem to travel the length of it for some distance and by using a crosswind to the trail, you’re usually in business.

            If you will use the information above, I can guarantee you that your success rates  on bucks–especially trophy bucks– will dramatically increase. And once you tag them, they have to be field-dressed and butchered. This is where Havalon knives come in handy.

I am decent at sharpening a knife, but like most deer hunters there are other things I would rather do. However, by using Havalon knives with their quick-change blades, field-dressing and butchering deer becomes a fast and efficient task—with no knife sharpening ever required. The only problem you may encounter is having to be a little more careful since the Havalon blades are so sharp compared to the knives you normally use!

#       #       #

Editor’s Note: The author’s best selling book, Mapping Trophy Bucks, can be purchased at Amazon here Mapping Trophy Bucks by Brad Herndon.  Many consider this one of the best deer hunting books of all time. 

Have you used mapping to bag a deer?  Share a note below.

13,751 total views, no views today
Posted in Brad Herndon, Deer Hunting, Guest Writers, Uncategorized | Tagged , , , , | 3 Comments

How To Field Dress a Deer Like a Pro

By Steve Sorensen

field-dress-a-deer-bow-hunter-havalon-knives

Do you know how to field dress that deer in your sights?

How many successful hunters know what to do when they pull out their knives?  Ask any local deer butcher, and the polite answer is likely to be, “Some don’t.”

That’s what every butcher I’ve asked has said. One butcher I know has even turned work away because a hunter did such a messy job. Occasionally a hunter brings him a buck fully intact. They’ll say removing the entrails should be the butcher’s job. More likely, they’re embarrassed to admit it makes them queasy.

It may not be every hunter’s favorite part of the hunt, but it’s most definitely the hunter’s job to know his way around the innards of a deer. You probably do, but just in case you don’t, or you want to learn how someone else does it, read on for step-by-step instructions on how to field dress a deer and the low-down on the absolute best tool for the job.

Why, What, and How?

Before telling you the “how,” I’ll tell you the “why” and the “what.” Why do you field dress a deer? Several reasons. One is to make sure the meat cools quickly. The organs inside the body cavity all generate heat. Without field dressing, the only way for that heat to escape is through a hide covered with dense insulating hair. By removing those organs, you not only dump a lot of that heat out, you also let air into the body cavity to carry heat away.

Another reason to field dress a deer is to get rid of the blood. Some old-timers used to “bleed” deer by slitting their throats. That’s ineffective because after the heart has stopped there is nothing to pump the blood out. It will stay inside the body cavity and inside the muscles until field dressing.

A third reason is to remove bacteria from inside the deer. The digestive tract contains bacteria that help break down the deer’s food. If any of those organs were ruptured by a bullet or cut by an arrow, the bacteria will soon contaminate the meat.

A fourth reason is that field dressing the deer will lighten your load. The next time you harvest a deer, drag it 100 yards before field dressing it. Then field dress it, and notice how much easier it drags. Removing the entrails makes a big difference – as much as 25%. Would you rather drag 190 pounds up over the hill, or 145?

Now For the “What”

What it takes is a knife. I’ve dressed deer with all kinds of folders, fixed blades and even multi-tools. Once I used a slippery little slab-sided “gentleman’s knife” with a blade about an inch and a quarter long. Some resourceful hunters (who weren’t resourceful enough to remember to pack a knife) have bragged about using a razor blade box cutter, a utility knife, a broadhead, or even the edge of an axe. Most recently I’ve done the job with a surgical scalpel, and here’s where I tell you the best knife of all.

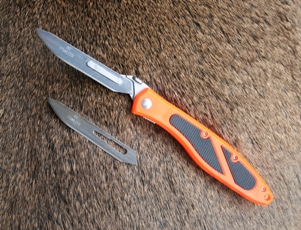
The surgical scalpel is far and away the best choice for the job. Where do you get one? Havel’s, a long-time medical supply company that makes scalpel blades for surgeons all across the continent, has branched out into the sportsman’s market with a new division named Havalon. They offer the Havalon Piranta, a knife that uses Havel’s replaceable surgical scalpel blades.

One of the big benefits of the surgical blade is that you no longer need to sharpen a knife. The blades are inexpensive and when one gets dull, you just replace it and keep going. It’s honed to a sharpness you’ll never achieve on your own.

Good for you if you sharpen your own knives, because knife sharpening is a dying art. But even if you are the best at it, and even if you have the newest fandangle sharpening system, you’ll never get as consistent an angle or as polished an edge as a Havel’s blade has when you tear open its sterile, protective wrapper.

Havalon makes several lightweight folders in various designs from metal and ABS plastic. Some have handsome laser-engraved handles, and they even make a couple of fillet knives for fishing. The common element is the way the scalpel blade attaches.

The blade has a keyed slot that snaps securely onto the knife “fitment.” It’s a good idea to practice removing and replacing the blade a few times before it’s actually time to use it. You probably won’t have to change it in the field but if you do, be especially careful – a little blood will make it slippery.

The beauty of this wicked sharp blade is that, instead of applying pressure to cut, you simply guide the edge where you want it to go.

Finally, the “How” of How to Field Dress Your Deer

how-to-field-dress-a-deer-by-sorensenEveryone does it a little differently. I’ve seen demonstrations at sportsman’s shows. I’ve watched other hunters. And I’ve tried different ways myself. I don’t claim to be the world’s expert on the subject, but I know how to do a nice, clean job in minutes.

It shouldn’t be necessary to say this, but first be sure your deer is dead. If you think “ground shrinkage” of a deer’s antlers makes the moment anticlimactic, think of the effect of a kick to your head from a deer that isn’t quite dead.

I begin at the back end, work my way to the front, and then return to the rear to finish the job. I recommend wearing latex gloves. People debate whether you can get diseases from deer tissues, but for me a bigger reason is that gloves make clean up easier.

1) First I cut around what, in respectful company, we call the “vent.” Here’s the first place where you’ll notice the difference a Havalon knife makes. The tissues of the deer in the anal area are very soft, and also very elastic. The blade tip of every other knife I’ve used tends to stretch the skin without cutting through.

This elastic tissue offers no resistance at all to a knife as sharp as the Havalon. Just slip it in about an inch away from the orifices, and cut around them to loosen the plumbing. You’ll be coming back to this at the end.

2) Next, follow the crease between the legs toward the abdomen. (If the deer is a buck, you’ll need to separate his manhood (buckhood?) from his body, but don’t sever anything – later you’ll pull his sex organs through to the inside and out with the whole gut pile.)

3) Then you open the abdomen. Again, with a blade this sharp, you barely need to touch the animal’s skin to start a small incision. Insert the blade into that incision, sharp edge up, and put your thumb and index finger of your opposite hand on each side of the knife at the base of the blade. Using the backs of your other fingers, put light pressure against the abdominal organs to keep them away from the knife blade. At this point both hands will be together, and you can zip the abdomen open right up to the sternum, or breastbone. (Use a forward rather than an upward motion.) It’s almost like the proverbial hot knife through warm butter.

4) With the abdominal cavity open, reach in near the last rib on each side and slice away the diaphragm. That’s the thin wall of muscle that separates the abdominal organs from the chest cavity. Once you’ve severed the diaphragm, reach up inside the chest cavity and grip the heart and lungs. Pull them as far as you can without straining, and reach up farther with the knife to sever the windpipe, gullet and blood vessels. You’re almost finished.

5) Go back to the posterior end where you started, reach inside the pelvis, and grip the urinary tract behind the bladder. Pull the vent and sex organs through the pelvis. Some hunters recommend tying off the plumbing so that you don’t spill the contents of the bladder. That’s not necessary if you pinch the tube and avoid squeezing the bladder. Now you can strip out all the innards.

Finally, turn the deer right side up and spread the legs against the ground to open the cavity and let the blood drain out for a minute or two. Don’t forget to tag your deer, and you’re ready to drag.

Follow these instructions and your butcher will consider you a pro at field dressing a deer. He might even point to your deer to show the next guy how it ought to be done.


sorensen-with-10-point-2012-480x609Outdoor writer and speaker Steve Sorensen has been a fan of knives since he began begging his dad to take him hunting when he was six years old. His articles have been published in North American Whitetail, Bear Hunting Magazine, and many other top magazines across the USA. Invite Steve to speak at your next sportsman’s event, or follow his writing on his website, EverydayHunter.com.


shop-havalon-now

Click here to read Jesse and Ryan’s full review…

47,484 total views, no views today
Posted in Ask Havalon, Deer Hunting, Field Dressing Tips, Guest Writers, Skinning Knives, Steve Sorensen, Uncategorized | Tagged , , , , , , , | 15 Comments