The Bear Baiter’s Manual: A Review

Innovative Black Bear Baiting Tactics
by Bernie Barringer

Book Review by Steve Sorensen

Occasionally the Havalon Sportsman’s Post reviews books we’re sure you’ll benefit from. Here’s a book by Bernie Barringer, a black bear expert if there ever was one.

Bear-Bait-Manual-Cover-blogThe author knows his stuff. He ought to, because he has been baiting bears for himself, his family and his friends for decades. And he’s been hunting bears with guides for just as long. And he’s been writing and editing the work of others who write about bears for several years.

He just might be North America’s leading expert on baiting black bears. Of course, I have no way of knowing that for sure, but I’ve read a lot of books on bear hunting and none are as comprehensive as this one on the topic of baiting. If you think baiting bear amounts to dumping some doughnuts in front of a treestand, well, you’ve probably never seen a bear bait.


The Truth About Bear Baiting

He begins by dispelling the view that baiting is easy. It’s not. It’s just easier than the impossible task of finding a bear to shoot in a jungle so thick you can’t see more than a few feet in front of you.

And the impossibility of finding a bear that way (to say nothing of the danger) isn’t so much because you can’t see. It’s because he can smell you so you won’t see him. In chapter after chapter, Barringer praises the bear for his powerful nose – because over and over and over he has witnessed bears using it to survive. A successful bear baiter must conquer the bear’s nose.

After a quick opening chapter on the amazing ways black bears are equipped to survive, he organizes his topics from general to specific: general bait locations, specific sites, picking out the precise spot, site improvement, placing a treestand, and cutting shooting lanes.

Packed with Tips It Would Take An Entire Career To Learn

Barringer delves into the baits themselves – what to use when starting a bait site, how the nutritional needs of bears relate to your bait, how much and how often to bait, how to fine-tune your bear bait to the individual tastes of bears, what are various ways to present the bait… the good stuff just keeps coming.

Here are a couple of tips I’ve never read anywhere else (1.) For a much greater chance the bear will come to your bait in daylight, locate it so he has a line of travel that keeps him in thick cover. (2.) The perfect shape for a bait site is a lightbulb-shaped opening with the stand at the stem end and the bear bait at the bulb end. Those are just two. Read the book with a highlighter – you’ll find a lot more.

Most book titles promise more than they deliver. Not this one. It is about bear baiting – you can learn other things from other books. To the degree Barringer discusses weapons, trail cameras, bug protection and other things – it’s all about how they relate to baiting.

The Three Audiences That Need This Book

  1. The frequent bear hunter. You’ll know how to evaluate outfitters after reading this book. Second, outfitters themselves.
  2. Outfitters seldom see how others do it, so the good ones subtly pick the brains of the hunters they guide to glean information that will make them better. There’s more here than any outfitter will ever learn on his own.
  3. The do-it-yourself hunter. This book will shorten the learning curve and give a hunter a lifetime of experience almost instantly.

Who knew a writer could fill 220 pages with quality content about baiting bears? Bear Baiter’s Manual is all that and more, including 90 color photos. You can order it from the author’s website www.bowhuntingroad.com. If you have any interest in black bears, it will be the best $20 you’ve ever invested in bear hunting.

About Steve Sorensen…

Outdoor writer and speaker Steve Sorensen writes an award-winning newspaper column called “The Everyday Hunter®,” and he is the editor of the Havalon Sportsman’s Post. He has also published articles in Deer & Deer Hunting, Sports Afield, and many other top magazines across the USA. Invite Steve to speak at your next sportsman’s event, and follow him at www.EverydayHunter.com.

To read more articles on Bear Hunting, click here.

See the best hunting knife for bear hunters here.

Enhanced by Zemanta

5,897 total views, no views today
Posted in Bear Hunting, Bernie Barringer, Steve Sorensen, Uncategorized | Tagged , , , | 3 Comments

Bass Fishing: Shallow, Deep, or In Between –
Bump the Stumps for Summer Bass

By Bernie Barringer

Ideas for catching lunker largemouths –
and the right tools for the job.

find bass in drowned trees in reservior 448x300

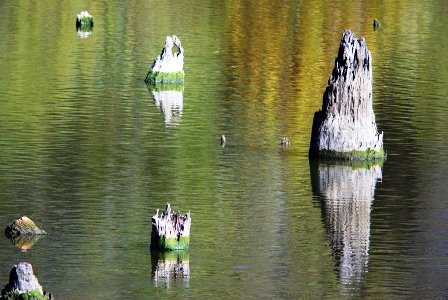
Look for drowned trees in reservoirs – that’s where you’ll find bass. It doesn’t matter whether the trees are broken off or still standing, bass love ’em all.

All across the United States, from the 1920s to the 1970s, hundreds of reservoirs were built. Their intended purposes were hydroelectric power, flood control and irrigation, but they have brought a remarkable benefit to fishermen. In fact, some of the best largemouth bass fishing in this great land takes place at these impoundments. Prime time is mid-summer when the water is warm and the bass are on the prowl.

Sometimes the land was logged off before being flooded, but often the trees were left standing and died a slow death, leaving gnarled stumps poking out of the water. Above the water, they look dead and lifeless, but below the surface is an entirely different story. They are, literally, trees of life in any reservoir.

stumps offer food for bass 299x448

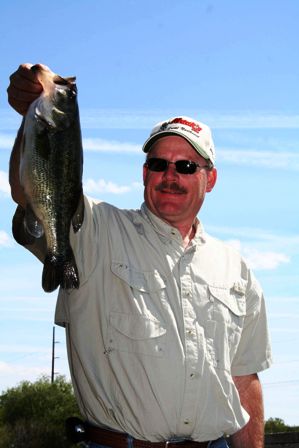
Largemouth are drawn to stumps because they offer plenty of food from the bottom of the food chain on up. They draw baitfish, which in turn draw lunker bass.

Calling these stumps home are the insects, crustaceans, microorganisms and – of course – the predators that eat such things. Largemouth bass are one of the primary predators in these environs. Bass also use the stumps for shade and cover in clear water reservoirs.

Shallow, deep or in between, here are some ideas for catching these lunker largemouths and the right tools for the job.

Shallow Bass – Spinnerbaits
Where stumps intersect the bank, they are nearly always mixed with some kind of vegetation. Weeds and grass grow out to depths of about three to four feet in most reservoirs, and much deeper where water clarity allows sunlight to penetrate. A spinnerbait is one of the best baits for catching largemouth here. Just cast it out and reel it back, maneuvering it around the stumps and pulling it through any weedy areas. When the water is warm you can’t fish them too fast.

In the shallows, many of the trees have fallen and will be lying on the bottom. Don’t be afraid to bang your bait onto the logs and stumps. The sound and change in action will often trigger a strike. Pay special attention to the places where the logs and stumps create shade, that’s often where the big, hungry ones lie in ambush.

deep diver lures for bass 448x336

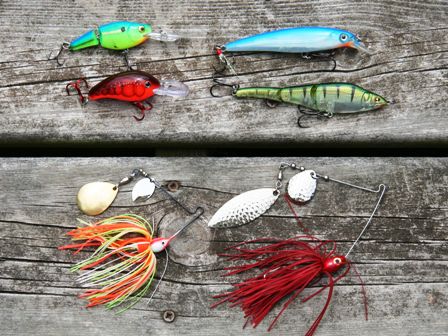
Deep divers have a large bill and are typically short and rounded. The longer the bill the deeper they go, the wider the bill the more they wobble. Jerkbaits can have a small bill to help them dive down, but are suspending which is important. The Sebile Magic Swimmer is in a class of its own and has remarkable action. Spinnerbaits come in several sizes but they key thing to remember is that wide Colorado blades cause more vibration—better for dirty water, and the narrower willow leaf blade creates more flash—better for clear water.

Mid-Depth Bass – Jerkbaits
Just beyond the deepest weeds, the bass are chasing minnows and small panfish that are in the stump-fields feeding on all the good stuff provided by the fertility of the rotting stumps. When we speak of mid-depth ranges, we’re usually talking four to eight feet in most reservoirs. The bass can be anywhere from top to bottom so it is best to cover a variety of depths with a jerkbait.

A suspending lure such as a Rapala Husky Jerk or X-Rap are personal favorites. In fact, I used a jerkbait to catch my largest bass ever at Lake Ouchita in Arkansas. It was a 9-pound giant tucked into a wad of stumps and I was lucky to get the brute wrestled out of the cover. That’s a big bass for a northern boy like me, but largemouths that size are fairly common in reservoirs of the southeastern United States.

Working these baits is very simple: twitch them by flicking your wrist downward with each turn of the reel handle. When you get the hang of it, that’ll give you great side-to-side action that’s hard for bass to resist.

stumps surrounded by weeds hold largest bass  299x448

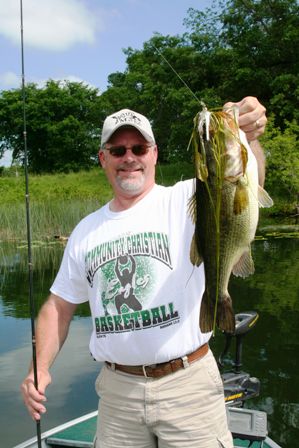
Stumps surrounded by weeds in shallow water hold some of the largest bass. Doesn’t matter that the water may only be a couple feet deep, the area has all the right ingredients for the bass.

Deep Bass – Deep Divers
Bass in ten feet or more require the use of a deep diving crankbait. The best time to fish out deep is when the wind is causing wave action against the stumps. This activates the food chain and the fishing can be out of this world as the big fish hungrily chase everything that moves and looks like food.

Cast a deep-diving crankbait out and crank it down hard before beginning your retrieve. Use a floating bait or you will lose enough to make you cry in the branches. When it bangs a stump or a branch, give it some slack line and allow the floating lure to float free of the wood. Yes, you will lose a few, but the big bass you catch will be worth it.

Bumpin’ the stumps for summer bass is fun fishing. It’s also a great time to catch the biggest bass of your life. Find a reservoir near you and let the bass prove me right!

***

About Bernie Barringer

Bernie Barringer hunts and fishes for a variety of species in several states and Canadian provinces. He has published more than 400 articles in two dozen outdoor magazines and authored 11 books on hunting, fishing and trapping. The latest is Bear Baiter’s Manual. He is the managing editor of Bear Hunting Magazine, and blogs his hunts on his website www.bowhuntingroad.com.

Click here to read more great articles on bass fishing, by Havalon’s pros.
[hs_action id=”7208″]

11,736 total views, no views today
Posted in Bass Fishing, Bernie Barringer, Fishing Tips, Guest Writers, Uncategorized | Tagged , , , | Comments Off on Bass Fishing: Shallow, Deep, or In Between –
Bump the Stumps for Summer Bass

How to Make Delicious Turkey Jerky

By Tom Claycomb III

Follow these 5 easy steps to make delicious turkey jerky 

I’m amazed at how many turkey hunters in America smoke their turkeys. If you have one from this season why not try a little different twist? Make him into turkey jerky. If you’ve never made turkey jerky don’t panic – it’s pretty simple. So, where do we begin?

turkey jerky step one bone out turkey breast 448x336

Bone out the breast, and don’t waste any meat.

1.  First let’s pick our spices.
It’s fun to mix your own. You can create a mixture of salt, pepper, garlic, Worcestershire, cayenne, and soy sauce. However, to get started I’d recommend using a pre-mixed package. The good thing about premixed kits is that they come with cure (nitrates) so you can keep your jerky unrefrigerated. This allows you to throw a baggie of jerky in your backpack and go hunting all day and it won’t spoil.

I’ve had super good luck with Hi Mountain Seasonings. I love their Hickory Jerky mix.

2.  Now let’s prepare our meat.
You can use all of your turkey or just use the breast. It’s easier to slice if it’s slightly frozen. Normally I slice my jerky as thin as I can, but turkey meat is softer and after you mix it up it spreads out thinner than you originally sliced it. You can experiment and see how you like it but I recommend cutting it a little thicker than you would deer meat.

slightly frozen turkey meat better for slicing 448x336

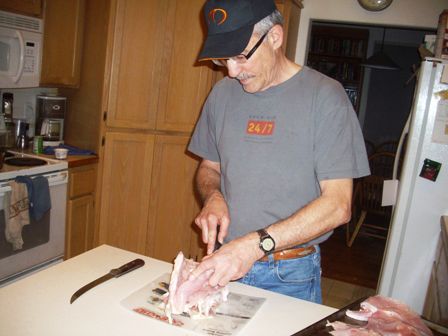
When your meat is a little stiff from still having a little frost in it, you can slice it more uniformly.

I noticed that Hi-Mountain also sells a kit they call “Jerky Board & Knife Set.” It has a slicing board, knife for slicing the meat, and also comes with spices. It should be a good starter kit. Or, Havalon’s super-sharp Baracuta-Blaze Hunting Knife makes a great jerky slicing knife.

Some people whack out and remove every trace of fat and gristle. Now let’s think about that for a minute. Do you really think they do that commercially? Why do you think you end up with so much chewy product? The less you do, the more jerky you’ll end up with, so you don’t need to go overboard on your trimming unless you want to.

If you decide to start with a package of Hi Mountain seasoning, be aware that it calls for a 15 lb. batch. Now I don’t know about you but I can’t remember the last time I shot a wild turkey that had a 15 pounds of breast meat. So you have two choices. Measure out enough spices for however many pounds of turkey meat you have or go buy more to round out to 15 lbs.

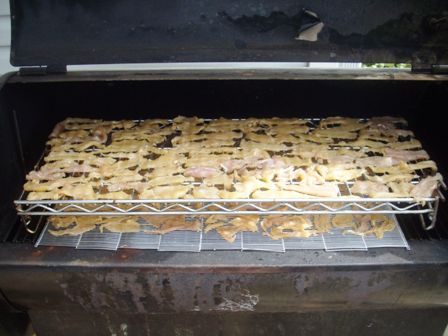
dry turkey meat into turkey jerky on racks in smoker 448x336

You can dry it on racks in your smoker.

3.  Sprinkle on the spices and mix in.
You need either one large tub or a couple of big bowls. They tell you not to use metal bowls – the salt in the cure can damage them. The cure and seasoning will come in different packages so mix equal parts in the supplied bottle and shake it up. Sprinkle on and mix the meat. Be sure to mix thoroughly.

Then cover the bowl and put it in the refrigerator. In a few hours, mix it all up again. The next morning mix it up a third time. It’s best to let it season for 24 hours.

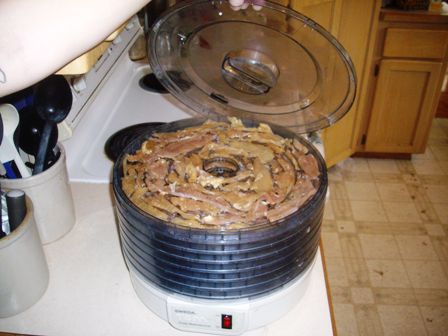
dry turkey meat in dehydrator 448x336

You can dry it on trays in a dehydrator.

4.  Now it’s ready to dry.
Native Americans hung their jerky on branches and let the sun and wind dry it out. We have several better options at our disposal now. Here are three:

  • Hang it on the racks in the oven and crack the door a little to let out the moisture. Put cookie sheets under it so it doesn’t drip in the oven.
  • Use a fruit dryer or dehydrator.
  • Put it in your smoker on very low heat.

The cure is what allows you to smoke/dry at very low heat. If you make a homemade mixture, then you want to make sure your jerky hits an internal temperature of 160°.

delicious turkey jerky 448x336

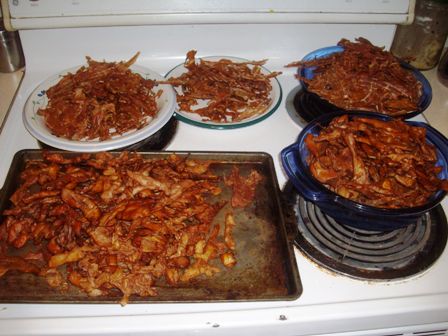
There’s plenty of enjoyment in the finished product!

When I use my fruit dryer I’ll rotate the bottom rack up to the top after a few hours because the bottom rack dries faster. Yesterday when I made a batch I dried some in my fruit dryer and the rest on my smoker. On my smoker I dried it on the lowest heat setting and even then I turned it off every 10 minutes. One caution: I don’t over-dry my jerky. (If I dry it too much it gets very hard and it hurts my teeth.)

5.  Package to please.
Now all that is left to do is to remove it from the racks and let it cool. Then put it in portion sizes in freezer baggies and store in the freezer.

Here’s where I need your advice – how to I hide my stash of turkey jerky so my wife and kids don’t eat it all as soon as I head out of town tomorrow?

***

tom claycomb outdoor writerAbout Tom Claycomb III

Tom lives in Idaho writes outdoor articles for various newspapers, magazines & websites. If it’s something outdoors, he probably likes it. You can read some more of his writings at: www.Amazon.com, www.TomClaycomb3.com, and www.BassPro.com.

 For more delicious turkey recipes, click here.
[hs_action id=”7476″]

7,638 total views, no views today

Posted in How To, Recipes & Cooking, Tom Claycomb III, Turkey Hunting, Uncategorized | Tagged , , , | Comments Off on How to Make Delicious Turkey Jerky

How to Photograph Your Turkey Trophy

By John Trout, Jr.

After the turkey hunt, don’t forget the photos!
Follow these 10 tips to get the best trophy gobbler pictures.

strutting tom turkey 298x448

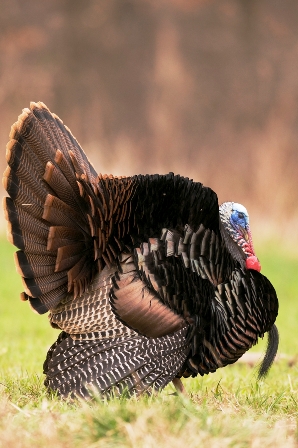
A strutting tom is a beautiful sight as he approaches. With today’s digital cameras, you can easily make this memory last forever after the kill. (Photo by John & Vikki Trout)

The era of digital photography has made it much easier for sportsmen to create memories that last forever. Compared to the cameras and the cost of film during the olden days, you can now get more and better trophy gobbler photos than ever before. Here are 10 ways to make certain you capture and preserve the best possible memory from your hunt.

1.  Clean Up the Gobbler
Unlike the whitetail deer, turkeys are seldom as messy. Nevertheless, blood should first be wiped off the neck and head. Second, make certain feathers are not out of place. If the turkey is wet, spread the wings and tail fan and hang the bird in direct sunlight or where the wind can dry the feathers before shooting photos.

2.  Avoid Busy Backgrounds
Select a location where the background won’t distract from the primary subjects, such as you and the gobbler. One example would be a hilltop in an open area where a sky background exists. However, any open area where the woods or brush is a considerable distance behind the subject could make a wonderful location. If you’re feeling creative, try photographing the hunter and bird along the edge of a woods, but make sure dense vegetation isn’t right against the subject’s background.

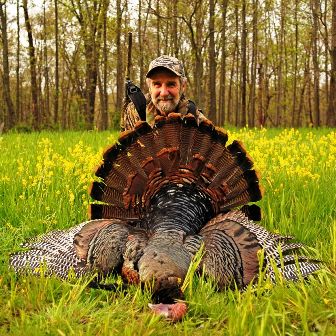
trout jr with trophy tom 336x336

Any type of floral touch in the background, such as these yellow wildflowers, can make your “spring” hunt look breathtaking. (Photo by John & Vikki Trout)

3.  Position the Turkey
The most popular scenario is to position the hunter behind the tom’s tail fan. This always provides colorful photos, and shows the turkey’s most beautiful plumage. Nevertheless, consider having the hunter throw the bird over a shoulder, as if they are packing out the gobbler. This often shows the “real hunt,” and could better show the gobbler’s long, thick beard.

4.  Closeness Counts
The mistake I see most often when looking at trophy photos is too much distance between the photographer and subject. Yes, closeness counts. The ideal frame is to have only a small amount of landscape around the subjects. If the centered subjects consist of about two-thirds of the photograph, you are in business. Unless the scenery is the main reason for the photo, avoid showing more scenery than hunter and gobbler.

5.  Add Landscape
Although I just discussed the benefits of avoiding busy backgrounds and making sure the subjects are close, there are times that a little landscaping adds to the photograph. One example would be a farmland scene. Alternatively, you might want to add a rolling hill, clouds, fenceline or something else that shows your hunting area along with your trophy tom. Landscapes are wonderful additions, providing the subjects are to one side or the other of the photograph. In other words the hunter and turkey should be on the left or right side of the frame and take up about one-third of the photograph. I would also suggest you shoot only horizontal photos, since these usually produce the best landscapes.

vikki trout with trophy tom by fence 298x448

The hunter doesn’t always need to place the gobbler on the ground and kneel behind the tail fan to create a magnificent photo. (Photo by John & Vikki Trout)

6.  Lighting and Shadows
The golden rule of photography is to make certain the sun is behind the photographer. Always avoid shooting into the sun. This often creates backlighting, which blackens the gobbler and hunter. Nothing beats a soft lighting, usually the result of high clouds. This also rids the area of shadows. If shadows are present, make sure the subject is moved away from them.

7.  Show What Counts
Because a gobbler doesn’t have headgear, make sure the turkey’s neck and head are not the primary subject of the photograph. It’s far more important to make certain the beard and colorful feathers show. Always keep this in mind before clicking the shutter. Make sure the beard is not pinned under a bird’s breast, and that at least one wing or tail fan is spread.

8.  Camo Clothing and Hat
Camouflage clothing always adds the perfect touch to a turkey hunting photograph. The camo hat is also a major plus, even if it advertises your favorite product. Blue jeans and colorful hats that advertise your favorite sports team are not recommended. If you have a turkey hunting vest, make sure it’s in the photo. The same goes for your gun or bow, since they will add to the photographic memories many years later.

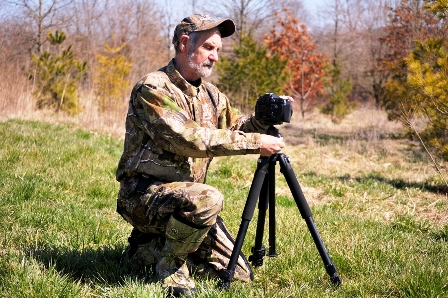
trout jr setting up camera tri-pod 448x298

A tripod and a self-timer on the camera allow you to shoot wonderful photographs of your trophy when you have nobody to help. (Photo by John & Vikki Trout)

9.  If You’re Alone
Yes, it is possible to capture wonderful photos if you have no one to help. Many of today’s digital cameras include a self-timer. You can set the timer to shoot the photograph in so many seconds, giving you time to set up with the gobbler. A tripod (or other camera support device) will take the place of the person who holds the camera. First, though, you will want to look through the viewfinder to make certain you have the proper alignment and framing.

10.  Shoot Lots of Photos
Regardless of whether you shoot the photos yourself with the aid of a tripod, or have someone else assist you, always shoot lots of photographs. As the old saying goes, “Film is cheap.” Pixels are even cheaper, and because photos are stored on a memory card, you no longer have to pay for processing. One secret to good photos is lots of photos, so the more you shoot, the more you have to choose from!

***

john-trout-jr-236x235About John Trout, Jr.

Southern Indiana hunter John Trout, Jr. is a full-time freelance writer and photographer specializing in whitetail deer, wild turkey and black bear. He has authored eight books and his work has appeared in nearly every publication in North America. You’ll enjoy a visit his website at www.troutswildoutdoors.com.

Click here to read more articles on
turkey hunting by Havalon’s outdoor experts.

[hs_action id=”7201″]

7,192 total views, no views today
Posted in Guest Writers, How To, John Trout, Jr., Land & Water Fowl Hunting, Turkey Hunting, Uncategorized | Tagged , , , , , | Comments Off on How to Photograph Your Turkey Trophy

Trout Fishing Tips: Trolling Stocked Trout Lakes

By Mike Bleech

Questions on trolling for trout? Here are the answers.  

trolling stretches fishing time 298x448

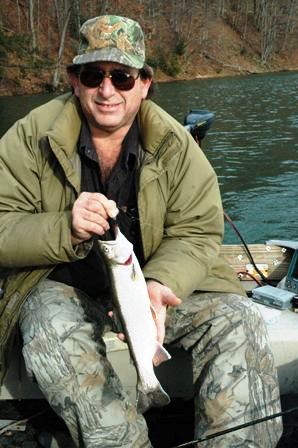
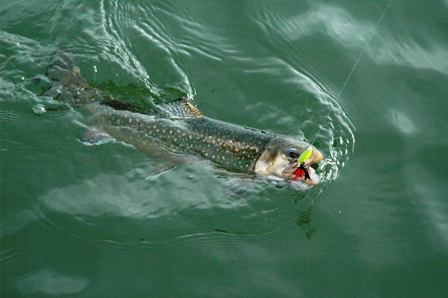
Trolling stretches the time when you can catch trout from a stocked trout lake.
(Photo by Mike Bleech)

Anglers who fish lakes stocked with adult trout tend to find a place along the bank where they can relax while fishing. Or, if they fish from boats, they do pretty much the same thing but with the advantage of being able to fish just about anywhere.

Relatively few take this to the next level and troll for trout. What’s the advantage of trolling? When trout numbers have been thinned by weeks of fishing, this more aggressive approach can keep you catching fish.

1.  Where to troll for trout?

While the majority of anglers wait for trout to come to them, which is less and less effective as the stocked trout numbers decline, trollers are more proactive. They go to the trout, increasing the number of trout that see their lures. Even at the slow speeds necessary when the water is cold, a boat might travel a few miles in a day of trolling. Imagine how many trout might be encountered by a line that stretches for miles versus a single point. This is why trollers can enjoy good fishing much longer than stationary anglers.

Lakes that are stocked with adult trout might fit many descriptions. But to keep things simple and manageable, we’re talking about these basics:

  • A small lake, less than 500 surface acres, maybe little more than a pond.
  • On many small lakes, only electric motors are allowed, which means boats will be small.
  • Equipment will be minimal. This is not about downriggers and planer boards. We may be stepping up our fishing tactics, but this does not mean making life complicated.

A side benefit of trolling for trout is that it gives anglers a much better picture of where trout can most likely be found. (Make a note and file it away, because this can be carried over even into the ice fishing season.)

2.  What special gear is needed?

holding rod allows detection 448x298

Holding your rod in your hand will allow you to set the hook on hits that you might not even detect when the rod is in a holder.
(Photo by Mike Bleech)

It’s not necessary to buy special equipment just for this fishing method. Like all trout fishing, lighter line in the 4-pound to 6-pound test range produces the best results. If your favorite rig is loaded with heavier line, just add a 10-foot leader made with light line.

In deeper lakes it may be an advantage to use as many rods per angler as regulations allow, which necessitates the use of rod holders. But once you find a location pattern, you’ll probably be more successful using just one rod per angler, with the rod in your hands. This lets you set the hook, which of course can’t be done with the rod in a holder.

3.  What lures are most effective?

Start your trolling strategy by assembling a good selection of lures. Since trollers do not have to consider how well a lure casts, the lures you choose may be different from what you use when casting from a stationary position. The main considerations are the depth lures run, and having enough of a variety to match the mood of finicky trout. Why trout might prefer stick baits over wobbling lures, or spoons over spinners does not matter as long as you realize that it happens.

Colors also can be important. Maybe one specific color will be most appealing, or maybe shiny metallic lures will be more effective than painted lures.

using the right lure makes a difference 448x298

Using the right lure or the right lure color can mean the difference between a great day of fishing and getting skunked. Carry a good selection of lures. (Photo by Mike Bleech)

What this comes down to is that a larger selection of lures is an advantage, at least until reaching the point where you do not have time to use all of the lures. But face it, you probably enjoy buying lures and likely have more than you can ever use.

Determining which lure works best and which color is most effective is part of an overall process of finding a pattern that performs well at any given time. Effective combinations of lure and color can change often, even several times in a day. The angle of the sun, whether the sky is clear or overcast, and lake surface conditions all play a role. It might seem complicated, but everything has to do with the amount of light reaching the trout.

4.  How fast do you troll?

Trolling speed is another important part of a pattern. Using an electric motor, speed is measured by the speed setting which usually is on the tiller handle. The relationship of setting number and actual speed varies from boat to boat and from motor to motor. Again keeping things as simple as possible, in small boats with the electric motors typically used, the ‘1’ setting generally is best in cold water, and seldom do you need to go faster than the ‘3’ setting.

Trolling speed has a lot to do with the lure that should be used. Most lures run properly only in a specific speed range. Test the lure alongside the boat to see if it is running properly. Spoons, which you’ll probably use more than other types of lures, should wobble rather than spin.

A stiff wind will make it important to adjust the motor power setting when trolling direction changes from with the wind to against the wind. Against stiff wind, a higher speed setting might be necessary just to control a boat.

Just these few reasonably simple trout fishing tips should make you an effective troller in a stocked trout lake. It will stretch the amount of time when you can catch trout by several weeks, maybe even months, longer than stationary anglers.

***

About Mike Bleech

mike-bleech-outdoor-writerMike has been a full-time freelance writer/photographer since 1980 with more than 5,000 articles published in more than 100 publications. He is the outdoors columnist for the Erie Times-News and the Warren Times Observer. Over the years he has become an expert at hunting the Allegheny National Forest and other public lands, and an accomplished trout fisherman.

Click here to read more great articles on trout fishing by Havalon’s experts.
[hs_action id=”7208″]

Enhanced by Zemanta

10,978 total views, no views today
Posted in Fishing Tips, Guest Writers, How To, Mike Bleech, Trout Fishing | Tagged , , , , | 1 Comment