Buying Your Turkey Shotgun – the First Decision

by Steve Sorensen

How to choose from the three main types of shotguns.

sorensen with single-shot turkey 480x510

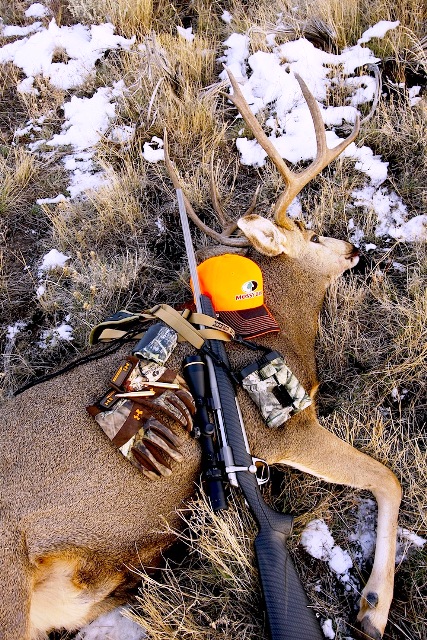
I have taken spring gobblers with a variety of shotguns. This one was taken with a single-shot. Its light weight was appreciated, considering the mountain I had to climb to get to the 22-pound bird.

“A shotgun is a shotgun.” Back when I started hunting turkeys that’s what we thought. The biggest issue was whether we should buy a 12 gauge or a 20. Some opted for the ‘tweener, the 16 gauge. In those days most guns had 2¾” chambers. A few were 3″ long. That, and the style of shotgun, pretty much sums up what we needed to consider.

A lot has changed. Today’s 3½” magnum chamber wasn’t even in the dreams of gun makers in those days, and the non-technical hunter can easily get confused talking about chokes, forcing cones, optical sights, and ammo. But the first question is still: Single-shot? Pump? Or auto-loader?

Like everything else today, turkey hunting has become specialized. And the guns we use are well-advanced over what your granddad carried. His venerable single shot killed gobblers graveyard dead, but turkeys may have been incidental to his hunting. His purposeful quarry was rabbits, squirrels, and pheasants; gobblers often came as a bonus.

Here, we’ll leave the technical issues aside and consider what’s safe and what makes sense for the beginning turkey hunter.

Single-Shot

Break-open single-shot shotguns are simple enough for a cave man to use, but a single-shot can make a great turkey gun today both for hunters starting out and also for seasoned hunters.

Safety is always the first consideration, and no firearm is safer than the one that has just fired its only shot. Do you think you need a back-up shot? Many seasoned turkey hunters rely on a single-shot because they don’t shoot birds at marginal ranges. They shoot when they know they can kill the turkey.

Remington 870 Pump Shotgun 640x326

A pump-gun is the jack-of-all-trades in the shotgun world, and it’s especially popular in the turkey woods. Team it with a good box call, and it’s all you need. Oh yeah—and a nice big cherry tree to sit against. This pump is Remington’s 870 ShurShot, dressed up and fine-tuned for spring gobblers.

The simplicity of a single-shot gives it two other advantages. One is that it’s less expensive. It’s a simple concept with few moving parts, easy take-down, and so it’s less expensive to design and manufacture. The consumer benefits by paying a lower price.

The other advantage of a single-shot is that it’s light. A slim stock, slimmer forearm, simple bead sight, no magazine to store shells and a simple break-open action make the one-banger perfect for turkey hunters who don’t want a lot of weight encumbering them as they cover lots of ground in search of lovelorn gobblers. Plus, it’s fast and easy to clean.

What about needing a follow-up shot?  It’s usually not necessary, but exceptions do arise. However, a single-shot is no handicap because it reloads faster than any other type of shotgun action. Just keep an extra shell where you can reach it without fumbling.

“What about a double barrel?” you ask. I shot my first gobbler with an old Ithaca double. It shares some characteristics with single-shots, but cost isn’t one of them. Older doubles are collectible, driving prices up. I’m definitely not against double barrel shotguns, but for all practical purposes, a double barrel gives you no significant edge in the turkey woods.

Pump-Action

The slide-action is the most popular shotgun in the turkey woods, and for good reason. A pump shotgun is still pretty simple, and still fairly light. I shot lots of turkeys with an old Ithaca Model 37 Featherlight pump made in 1962. Its only disadvantage was that it was limited to 2¾” shells, but with magnum loads, it will always be an effective turkey killer. With today’s 2¾” turkey loads, it’s enough to kill a gobbler at distances to 30 yards or more, depending on how tightly the load patterns.

sorensen with friend and run-down turkey 598x480

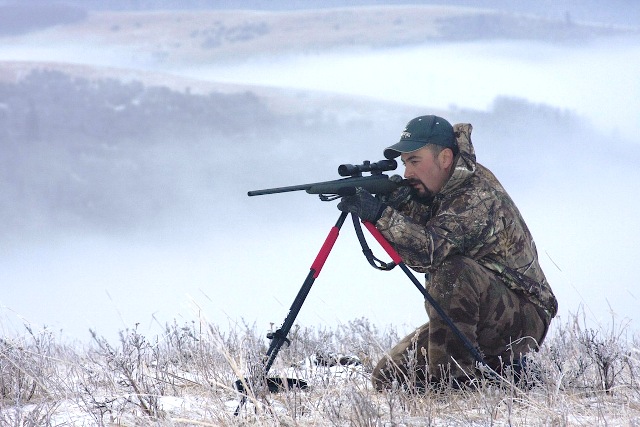
The only turkey I ever needed to chase down after shooting it. Fortunately I had a buddy’s help. The most dangerous moment in the turkey woods is when a hunter is running down a gobbler while carrying a loaded gun with the safety off. One word—DON’T!

My old Ithaca never let me down, but was more suited to rabbits and pheasants. So I graduated to a more specialized shotgun. I opted for another pump, Remington’s 870 dressed out in camo with their unique ShurShot stock that helps diffuse recoil. It comes with rifle-style TruGlo® fiber-optic sights, and is drilled and tapped for scope sights.

The pump-action shotgun can be as safe as a single-shot and in my opinion is safer than an auto-loader. Imagine yourself shooting at a gobbler, he drops, but you end up running through the woods to chase him down. If you have an auto-loader, the action has already cycled a live round into the chamber and you’re running through the woods with a loaded gun, safety off. That’s a prescription for disaster. When you’re anticipating a second shot, putting the safety on is a hard habit to form, but a pump can remain empty until you deliberately cycle a fresh round into the chamber for another shot.

Semi-Auto

Semi-auto shotguns (also called auto-loaders) have two advantages and two disadvantages. The advantage is they offer a quick follow-up shot. That advantage is greater when shooting at running or flying game. Your normal shot in the spring gobbler woods is a head shot on a turkey standing still. If you’ve called him to the right range, you shouldn’t miss. The other advantage is that semi-autos produce less felt recoil because part of the energy from the shot cycles the action.

The disadvantages are that an auto-loader is often heavier because they have more moving parts, they’re expensive because it costs more to make them, and they’re more complex than single shot or pump actions so more can go wrong. But if you don’t like the recoil of lighter guns, can handle a semi-auto- safely, and don’t mind spending more, then go for it.

Bottom line is that no turkey hunter will ever be under armed with a single-shot or a pump. Neither will ever go out of style in the turkey woods.

***

About Steve Sorensen

hunter outdoor writer steve sorensenOutdoor writer and speaker Steve Sorensen is the author of Growing Up With Guns, writes an award-winning newspaper column called The Everyday Hunter®, and is the editor of the Havalon Sportsman’s Post. He has also published articles in Deer & Deer Hunting, Outdoor Life, and many other top magazines across the USA. Invite Steve to speak at your next sportsman’s event, and follow him at www.EverydayHunter.com.

7,755 total views, 3 views today

Posted in Guest Writers, How To, Hunting & Fishing Equipment, Land & Water Fowl Hunting, Shotguns, Spring Turkey Hunting, Steve Sorensen, Uncategorized | Tagged , , , , | 1 Comment

Deer Hunting: 4 Steps to Lead You to Your Next Buck – Part 2

By Steve Sorensen

Success doesn’t come by starting to think about hunting
the week before the shooting season.

If you’ve begun a winter boots-on-the-ground and trail camera scouting program described in Part 1, it’s time to take the next step.

Step 3 – Hunt for Shed Antlers

shed antler found in bucks bedroom 539x480

The telltale curve of a good shed antler the author found
in a buck’s bedroom.

The third component to your off-season program is hunting for shed antlers. Having a shed antler from a live buck in your hands not only gets your predatory juices flowing, it tells you for sure that the buck you want is there.

Those buck bedrooms you discovered—the areas with single beds or multiple beds that were all made by mature deer? Mark ’em on your map. If there’re not all fresh, deer are using them repeatedly—maybe just one deer. And he may be a dandy buck. For whatever reason, he feels secure there. He has an attachment to the spot, and he’ll be back.

Sometimes shed antler hunting can be frustrating. You can walk for miles on trails, looking left and right, hoping to spot a shed. Why aren’t you finding sheds? You’re probably spending most of your time on doe trails. Instead, start in the buck bedding areas you’ve found. Follow the trails out to feeding areas.

Where I live in northern Pennsylvania antlers are hard to find. One reason is that we have lots of porcupines, and those rodents can gnaw an antler to nothing in as little as a day or two, recycling it for the calcium. Plus, they’re big enough to carry an antler off. Start shed hunting early—especially if there isn’t much snow—because you’re competing with nature’s recyclers.

Hunters find a set of sheds and end up killing the buck that wore them every year. That’s no accident. Shed antlers are the best clue you have that a nice buck is hanging around, and if you know he’s there and you learn more about him, the odds begin to swing your way.

Step 4 – Take a Hunter-Improvement Class

 deer study group 640x425

This group of hunters believes success is to be shared, and all of them enjoyed great success in the 2012 season. Hunting New York and Pennsylvania, George Kireta (demonstrating antler rattling) killed a nice 8-point, Dick Zimmerman (beside him) killed a 9-point and an 8-point, Audrey Zimmerman (across from George) harvested a great 140-class buck in New York, and the author (next to her) shot two 10-points. Another member of the group, Wally Chukai (missing from the meeting) shot an 8-point.

People take self-improvement classes in winter on many topics. They attend book groups, Bible studies, dance lessons and more. People get serious after the holidays with personal development programs and weight loss—so why not get serious about your development as a deer hunter? The local community college probably doesn’t offer a class, but you can start your own.

Get a half dozen good hunters together and create a course of study. Talk about the best books on deer hunting, share methods, attend seminars at sport shows, and evaluate each other’s experience. Share challenges as well as successes.

A word of caution. You may get more response if you don’t call it a “class.” Just say, “Hey—a few of us are getting together at my house to look at the new (fill in the blank) video, and I’d like you to come. I’ll provide the snacks.”

When they come, take charge. Ask what good deer hunting videos they have. Talk about your experience last season, and ask about theirs. Get them to talk about their most frustrating issues. Ask each person to give a brief post-season report. Talk about various parts of your county, about the equipment you use (trail cameras, tree stands, scents), and even ask others to bring items such as trail cameras to demonstrate and show some pictures. Make everyone feel like an important part of the group, and they’ll want to come again.

Make the class informal and spontaneous. That means no PowerPoint. The less formal it is, the more people will participate. They get enough formality in their jobs and their daily schedules. Don’t use language like reports, evaluation, analysis, study, and curriculum. Let them realize later that they’ve attended a hunter improvement class.

This is going to take some leadership, some thinking, and some planning, but in a few weeks you’ll bond and the gathering will take on more importance. The guys who are serious about deer hunting will begin to see that they can benefit from sharing success.

Putting the 80/20 Principle to Work for You

audrey zimmerman with 145 inch buck 576x480

Few hunters study deer as Audrey Zimmerman. Audrey worked on this 145-inch New York buck all through the 2012 archery season and killed it in firearms season.

If you put this 4-step program to work for you, you’re using the 80/20 principle, a principle that extends to the most commonplace issues. Don’t get hung up on the exact numbers, but think about it. In retail sales, roughly 20% of the products account for 80% of the revenue. In volunteer fire departments, churches, and civic clubs, 20% of the members do 80% of the work. And in hunting, 20% of the hunters have 80% of the success. The reason is they work on their hunting strategies all year long.

The top 20% of hunters are not luckier. They’re successful because they take the time to develop all the tools at their disposal. They spend hundreds of hours in the field outside of shooting seasons. They are more prepared. They read more. They study more. They think more.

One thing is sure—success doesn’t come by starting to think about hunting the week before the shooting season. You need to be an everyday hunter, a hunter with the attitude that hunting season lasts 365 days. The best athletes train all year long, and work at making themselves better. For a defensive end, opening day is the first day he can sack a quarterback. For you, opening day is the first day you can make a kill.

If you haven’t killed a good buck in a while, it’s time to break that drought. Start thinking about whitetails every day. They should never be far from your mind. Invest in the hunt year ’round, and you’ll be on the path to your next mature whitetail.

If you missed Part 1, just click here.

***

About Steve Sorensen

steve-sorensen-head-shotOutdoor writer and speaker Steve Sorensen is the author of Growing Up With Guns, writes an award-winning newspaper column called The Everyday Hunter®, and is editor of the Havalon Sportsman’s Post. He has also published articles in Deer & Deer Hunting, Outdoor Life, and many other top magazines across the USA. Invite Steve to speak at your next sportsman’s event, and follow him at www.EverydayHunter.com.


3,981 total views, 2 views today

Posted in Big Game Hunting, Deer Hunting, Guest Writers, How To, How to Hunt, Hunting & Fishing Equipment, Hunting Tips, Steve Sorensen, Tracking, Trail Cameras, Uncategorized | Tagged , , , , | 2 Comments

Deer Hunting: 4 Steps to Lead You to Your Next Buck – Part 1

By Steve Sorensen

Attention all hard-working, salt-of-the-earth,
rank-and-file hunters…

Will your financial resources buy you access to trophy whitetail habitat? Do you have the land and equipment to plant a network of perfectly-placed food plots? Do you have the time and money to travel to the best hunting states?

sorensen-with-10-point-2012-480x609

The author with his Pennsylvania 10-point from opening day, 2012. Right after deer season is the time to begin scouting for the next one.

For most of us, the answer to these questions is “No.” But I have good news. If you’re a hard-working, back-forty, salt-of-the-earth, grass-roots hunter, you’re not a second-class citizen in the hunting world. You can still succeed if you have a plan.

Here are four steps you can take to increase your knowledge and confidence – and lead to your next mature whitetail. Two steps today, and two steps next time.

Step 1 – Begin a Winter Scouting Program

Even though what I call “shooting season” (the dates your state game agency sets) is over, make up your mind that “hunting season” (the whole rest of the year if take your sport seriously) is not. So, even though shooting season is over, it’s still hunting season.

Look at it that way, and hunting season isn’t regulated by anyone. It lasts 365 days. Just as football players aren’t ready to walk onto the field on opening day if they haven’t been doing drills, learning the playbook, and improving their skills, hunters plan for success by learning and studying, and improving their skills, whether in the woods or at home.

Winter is a great time to do that. Go for a weekly hike. It can be for a couple of hours, or all day. Take a lunch and something warm to drink. Take binoculars. Photocopy a topo map or take a GPS and mark down notes about what you learn. The information you gather is valuable.

During winter, wildlife routines aren’t interrupted by hunters. You can see deer trails more clearly than ever. You can see how they snake across the landscape in the bare woods. You’ll find places where, standing in one spot, they’re visible for a hundred yards. You’ll even find secondary trails downwind of main trails. Note them because they’re often used by bucks.

pennsylvania-buck-at-licking-branch-640x384.jpg

This Pennsylvania 7-point pauses after working a licking branch treated with pre-orbital gland lure. Just before this still picture, the author recorded a good video segment which shows the buck clearly licking the branch and then applying his own pre-orbital scent.

Your winter scouting will also show bedding areas. Don’t worry that you might boot deer from their beds—you’re only one guy and they have plenty of time to get over the disturbance. At any other time of the year, bedding areas are so much more difficult to find. In winter they’re easy to read, especially if you have snow on the ground. Analyze them. Is there just one? Very likely it’s a buck. Are some smaller than others? Probably a doe family group. Are they all the same size? You may have found a secure hideout a buck bachelor group is using.

Also look for recent rubs, old scrapes, areas where deer have been feeding, and trails that funnel down to narrow places. Look for trees that might make good ambush sites for tree stands. Mark them with a reflective tack to help you find them later. You don’t have to decide on the exact tree you will hunt from, because in the fall when trees are leafed out everything will look different. But these spots will be good as gold come next shooting season.

Step 2 – Use Trail Cameras Early

Trail cameras will lead to more success than a new rifle and scope, or a new bow all decked out. I suggest using at least seven. That many allows you to scout multiple locations and gather a lot more information than one camera can. Put six out and carry the seventh when you check them. It will make you more efficient when you relocate a camera.

smokeys-pre-orbital-gland-lure-480x523

The author uses Smokey’s Pre-Orbital Gland Lure in his trail camera program

If you’re going to run a serious trail camera program, start early. Putting them out in late summer and fall isn’t enough. Start in the winter. You’ll get pictures of post-season bucks, and that will help your boots-on-the-ground scouting trips. It can also help you find more shed antlers (that’s Step three, to come), because pictures will tell you where to concentrate your search. But there’s a bigger reason to use them in the winter. Most hunters may not realize it, but bucks are acting like bucks all year long.

Every buck is part of a club, and you can take inventory on them even when they don’t have antlers on their heads. That’s because a primary way bucks communicate with each other is by means of a secretion from the pre-orbital gland. That’s a main function of licking branches—which they use 24/7, all 12 months of the year. They’re either gathering scent placed by another buck, or depositing their own scent. The licking branch is like the bulletin board at the local diner where every businessman who stops for lunch posts his business card.

Don’t worry about making mock scrapes below the licking branch. Bucks do that mainly in the late pre-rut and the rut. But they use licking branches every day. So, you need only one thing besides the camera—get some pre-orbital gland lure. It’s as irresistible to bucks as catnip is to cats. You can get it from various places; I order mine from Smokey’s Deer Lures.

I’ve talked to hunters in Pennsylvania, Ohio, West Virginia, New York, Wisconsin and Iowa who apply pre-orbital gland lure to licking branches and they’ve all been getting great photos.

I strongly advise using lithium batteries. They’re expensive, but in the long run they’ll definitely save you money, and they’re much more reliable. In my cameras (I use Bushnell and Moultrie), I’ve had a set of lithium batteries last from late winter to late fall, and even longer.

Begin your off-season plan with these first two steps, and you’ll be ready for the next two, coming in the next post.

Ready to read Part 2? Click Here.

***

 About Steve Sorensen

steve-sorensen-head-shotOutdoor writer and speaker Steve Sorensen is the author of Growing Up With Guns, writes an award-winning newspaper column called The Everyday Hunter®, and edits content on the Havalon Sportsman’s Post. He has also published articles in Deer & Deer Hunting, Outdoor Life, and many other top magazines across the USA. Invite Steve to speak at your next sportsman’s event, and follow him at www.EverydayHunter.com.


5,356 total views, 2 views today

Posted in Big Game Hunting, Deer Hunting, Guest Writers, How To, Hunting & Fishing Equipment, Hunting Tips, Steve Sorensen, Trail Cameras, Uncategorized | Tagged , , , , | 3 Comments

A Dozen Quick-Hit Mule Deer Tactics Every Pro Uses

by Ron Spomer 

When it Comes to Mule Deer Hunting,
Eyesight is Your Most Useful Piece of Equipment .

Using A Spotting Scope

  
It sounds easy – find a mule deer, sneak within range, and make a clean shot.
Sometimes it is that simple, but usually it won’t be. 

Here are some tips and tactics that bring success to top mule deer hunters:


Shooting Support

Carry a portable shooting support and practice with it at extreme range to be ready for western mule deer. In open country, good shots get their deer. Bad shots cry.

1. Carry great optics and use them – Binocular and spotting scope. An 8X binocular won’t enlarge quite as much as a 10X, but it’s easier to hold steady and it takes in a wider field of view. Neither 8X nor 10X will reveal much about antler formation anyway, so use the advantage of lighter binos with a wider field-of-view to locate deer. Then switch to the spotting scope to size up antlers.


2. Look over there… WAY over there – If you don’t find what you’re looking for with the bino, employ the spotting scope on lowest power to scour even more distant landscapes. Patience, my friend. The deer are out there, but they aren’t as easy to spot as the open terrain might suggest. This is especially true after they lie down, which usually happens an hour or two after sunup.


3. Start at the crack of light – Even if shooting hour hasn’t begun, get your eyes working. Mule deer, especially big bucks that get harassed, are like vampires heading for the shadows at first light. Scan feed fields and routes toward bedding cover, either woods or brush pockets. They’ll lie in ditches, gullies and coulees in plain grass if they have to.

Glass Will Save Your Feet

What is the key to a successful mule deer hunt? Glass, glass, and glass. There’s a lot of country out there and it’s more easily searched with your eyes than your feet.


4. Key on feed fields – After a long summer drought, most native grass, forbs and shrubs are dried up. If there are any irrigated crop fields, deer will find them. So should you. Glass for green patches at dusk and dawn.


5. Miles to go before they sleep – Mule deer are travelers. They’ll easily hike four or five miles from bed to food and back again. Scan the landscape for at least two hours before dark and after dawn.


6. Hit no man’s land – If you find a spot that looks like the middle of nowhere, it’s probably the middle of mule deer paradise. They like peace and quiet. But if hunters are moving everywhere, mule deer are perfectly capable of lying low in skimpy cover right close to human travel routes. They can out-whitetail a whitetail when it comes to hiding.


Colorado Mule Buck

Browning A-Bolt in 270 Winchester, 8x42mm binocular, 4-12 Leupold VX3 scope and rangefinder all contributed to bagging this good Colorado mule deer. Antlers that spread to the ear tips and reach an equal distance upward constitute a good quality buck. Add mass and deep forks, and you have a great one.

7. Don’t shoot the first big one – If you haven’t seen many mule deer, be prepared to be fooled by those tall, wide antlers. Even a small one looks huge. If possible, study mounts near home or at places like Cabela’s. Note how mass really makes a difference. A really nice buck’s antlers should reach to the tips of his ears and stretch equally high or higher. Deep forks are a big part of score. They should be at least as long as one of those mule-like ears.


8. Call – Like whitetails, mule deer does live in extended family groups, and the does will often run to the squall of a predator call, thinking it’s a fawn in distress. During the rut, the bucks that attach themselves to the doe groups will come with them. And even if they don’t come running, they may jump out of cover to expose themselves.


9. Wait – If you’re hunting woods, forests and deep brush, you may have to out-wait your deer. Study tracks and find feeding sites, then wait for deer to appear. Fawns and does will emerge first. Big bucks often hang just inside cover until dark. So scour those fringes with your optics looking for shine from antlers, noses and eyes. A big buck can freeze motionless for fifteen minutes, just watching before emerging. Stay low, motionless and quiet.


Glass, Glass, Glass!

Did I mention glass, glass, glass? Patience- keep looking. Cover country to reach new areas, but keep glassing.

10. Hunt early or late – In September bucks live in bachelor bands and feed in the light since days are still fairly long. In the high country they usually stay above treeline. In October they usually hide out in deep, dry forest where they don’t make a sound and you do – crunch, crunch. Try sitting waterholes if it’s dry and you must hunt October. Pray for snow. Better yet, wait until after November 10 when bachelor bands are broken up and big bucks begin wandering in search of doe groups. During the last half of November the rut is on and bucks expose themselves. Alas, not many states permit hunting during this vulnerable season. But some offer late season hunts via special permits. This is when high country snow pushes deer into small, low-lying valleys and hunting is much easier.


11. Become a better shot – Too many new muley hunters don’t train themselves to shoot far across open country. They miss their chances. A man or woman who can drop a bullet into a 12-inch circle with confidence at 300 yards has a much better chance at success. Extend that to 400 yards and you’re really sailing. But you have to be able to make the shot every time, not just some of the time. Practice, practice. And use a bipod or tripod. Natural rests are hard to find in grasslands.


12. Watch, listen, learn and enjoy – Even if you don’t get your deer, you’ll be alive in some of the most beautiful land God created. You’re using your eyes anyway, so revel in everything you see.  

***

To Read Some More of Ron’s Informative Articles, Click Here.


Ron SpomerAbout Ron Spomer

Ron is rifles/optics columnist for Sporting Classics and North American Hunter magazines and host of Winchester World of Whitetail on NBC Sports. Learn more at (www.ronspomeroutdoors.com)

[hs_action id=”8272″]


35,925 total views, 3 views today

Posted in Binoculars, Guest Writers, How To, How to Hunt, Hunting & Fishing Equipment, Hunting Tips, Ron Spomer, Scopes, Uncategorized | Tagged , , | 2 Comments

Your Guide to Scopes for Mule Deer Hunting

by Ron Spomer

Seven rules for scoping up for western mule deer.

Without a scope to aim it, the most accurate, powerful, flat-shooting mule deer rifle is little better than a .30-30 Winchester lever-action.

average sized mule deer 614x480

An average-sized mule deer buck on the rolling grasslands of the West – an exotic sight for eastern whitetail hunters.

Despite all the hype surrounding “magnum” cartridges and long-range bullets, superior scopes are required for them to live up to their potential. Putting the sight (reticle) on the same focal plane as the visually enlarged target makes it possible to wring the long range potential from today’s flat-shooting cartridges and bullets. But which scope?

Too many shooters assume that a long-range mule deer scope must include an objective lens the diameter of a beer can and magnification suitable for an astronomical telescope. In truth, a 3-9x40mm or 4-12x42mm scope is more than capable of directing bullets precisely to any mule deer 99.9 percent of shooters are likely to engage.

huge objective lens scopes are not necessary 640x427

Huge objective lens scopes are not necessary for mule deer hunting, but if you want to carry them, no problem.

This doesn’t mean that a 4-16x50mm, or a 3.5-18x44mm, or an even bigger scope is useless. They’ll work just fine. They might even provide slightly superior light transmission and a bit of useful magnification. But they’ll also add a lot of bulk and weight to your system, and when you’re hiking upwards of 10 miles a day, much of it vertical, weight is not your friend.

Whether you opt for a trim, 13-ounce 2.5-8x36mm or 24-ounce 5-25x50mm scope, be sure to buy one with the right ingredients.

Follow this outline and you can’t go wrong:

1.  One-piece aluminum main tube – This is the chassis that holds everything together. A one-piece unit is stronger and more durable than one that joins twin tubes to the center turret. Skip the weakening joints and it’s easier to keep moisture out, too. Aluminum has proven more than strong enough. Almost no one makes steel scope tubes anymore. If aluminum is good enough for fighter jets, it’s tough enough for rifle scopes.

top end optics and flat shooting bolt action  640x427

Top end optics and a flat-shooting bolt action like this Weatherby Mark V in .257 Weatherby Mag. are ideal tools for open country
mule deer hunting.

2.  Fully multi-coated lenses – This phrase means every air-to-glass surface within the scope is coated with multiple layers of anti-reflection coatings. This gives maximum light transmission (brightness) with minimum bulk and weight. A properly, fully multi-coated 10X scope with 40mm objective will be significantly brighter than a single-coated 10X with a big 56mm objective. The rule? Size matters, but anti-reflection coatings matter more.

3.  Lifetime guarantee – This might seem silly, but it suggests the scope is built well enough to deliver the next category, which is essential to performance. To judge the things you can’t see, you must rely on reputation, price and how well a company stands behind its product. Any company that guarantees a scope for life must know that it’s so well built they’ll probably never have to repair it.

4.  Repeatable durability – By this we mean the ability to hold zero come recoil or high water. I’d rather have a scope that’s 50 percent darker than one that can’t keep its crosshair where I zeroed it.

you dont need an oversized scope 640x480

You don’t need an oversized scope with 50mm objective and 25X magnification to cleanly pinpoint mule deer, but durability and good optical quality are to be treasured.

The best way to know a scope will “hold zero” is to zero the scope, then “shoot the square.” This means dialing the windage and elevation turrets to direct bullets in specific directions for specific distances. Here’s how: Set your zero and fire a shot. Turn the elevation dial as many clicks as required to shift the next shot 4 inches down (this would be 16 clicks in a scope with 1/4-inch click adjustments.) Fire a shot while aiming at the same aiming point as you did for your first shot. The new bullet should land 4 inches below the hole punched by your zero bullet. Next, dial as required to shift 4 inches right and fire a shot. Then dial 4 inches up and shoot, then 4 inches left and shoot. The last shot should land within your rifle’s accuracy potential near the initial shot. By drawing straight lines from shot to shot in sequence, you should get a big square.

5.  Repeat dialing – If you’re going to play the “dial and shoot” game, meaning you’ll dial corrections into the scope for long-range shooting, it must dial accurately. Shooting the square will reveal this. Scopes must be built precisely and durably to dial accurately every time. Don’t expect a $200 unit to do this.

mule deer long range  640x427

Shots at mule deer often come in wide open country where ranges can fool the inexperienced. Practice shooting long at home and you’ll score out West.

6.  Recoil endurance – This applies to you, but here we’re talking about your scope. Even if the scope’s reticle adjustments are slightly off, it could still perform consistently if it can hold zero. To test for this, shoot at least 20 rounds, preferably 40 rounds, during general practice. This can be done over hours, days or even weeks. The idea is to put 20 to 40-rounds of recoil pressure on the scope to “shake loose” any weak parts. If, after this many shots, the zero holds, it will probably hold for hundreds or even thousands more.

7.  Consider a fixed power – If you want to minimize potential scope malfunctions, avoid the bells and whistles and get a fixed 6X. There are almost no moving parts to screw up. With practice, you can train yourself to place shots accurately to 500 yards with a 6X, not that I recommend anyone but an expert’s expert try 500-yard shots. However, with today’s superior rifles, scopes and bullets, a disciplined, highly-trained shooter can shoot ethically and score at that distance.

But not without a dependable scope. And now you know what a dependable scope is.

Click here to read more great articles by Ron Spomer.

***

ron spomer with alberta mule deer 2008 448x313About Ron Spomer

Ron is rifles/optics columnist for Sporting Classics and North American Hunter magazines and host of Winchester World of Whitetail on NBC Sports. Learn more at (www.ronspomeroutdoors.com)[hs_action id=”8244″]

12,588 total views, 1 views today

Posted in Big Game Hunting, Guest Writers, Hunting & Fishing Equipment, Rifles, Ron Spomer, Scopes, Uncategorized | Tagged , , , , , | 1 Comment