Bowhunting: Add 15 Yards to Your Effective Bow Range

By Bernie Barringer

5 easy steps that will get you more shots!

Today’s archery equipment is capable of shooting remarkably well compared to even 10 years ago. Some of the most accomplished archers are shooting groups of eight inches or smaller at 100 yards under target conditions. Few bowhunters would take shots like that at animals, but the fact is that most modern, well-tuned bows are capable of shooting far better than you can shoot.
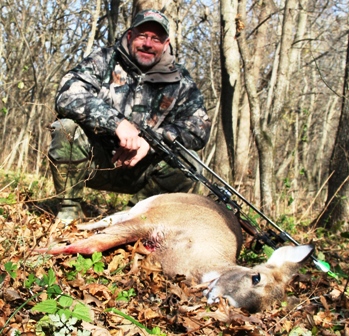
doe-ranged-at-41.5-yards-349x336

This doe was ranged at 41.5 yards. A heart shot put her down within 40 yards of the impact. Proper form and proper practice will extend your effective shooting range.

If your effective range is say, 30 yards, your bow is very capable of shooting much farther. All that is left is improving your skills so you can catch up. I have shot three deer in the past two years at just over 40 yards, which I consider to be my effective range. I am working diligently to extend my effective range to 55 yards, since I will be drawing an antelope tag for Wyoming next year, and the shots are likely to be long ones.

Here are five tips to help you add 15 yards to your effective hunting range. You can do this in two to three weeks if you are up to shooting about 50 arrows a day.

1.  Know Your Current Capability

Before adding any range to your shooting abilities, you must first establish a baseline. Start by being honest with yourself about what your current range is. If you’re punching groups that can be covered by the palm of your hand at 30 yards, that’s probably your effective range. That means under hunting conditions – with adrenal glands pumping, possibly some crosswind, and the likelihood that the target will move – your groupings will probably double in size. That’s barely good enough.

Shoot a dozen arrows and actually measure the group. One flyer out of the group is not cause for alarm, but it is something that needs to be worked on. If you can’t be consistent in a relaxed and controlled backyard environment, you sure aren’t going to be consistent when a big buck steps out. Plus, even today’s fast and quiet bows still cannot outshoot their sound. A tense deer is going to move a little before the arrow gets there. The longer the shot, the more it has time to move.

2.  Shore Up Your Style

set-up-shooting-area-448x299

Setting up a shooting area at your home makes practice easy and fun. The more accessible your practice area, the more you will use it.

Take a critical look at your form and style. It’s not a bad idea to enlist the help of an archery coach. Any little mistake you make at short to medium ranges will be magnified at longer ranges.

Several fundamentals need to be critiqued, such as arm position and elbow bend, anchor consistency, head position, stance and back tension. Work very hard on using good form before you try to extend your range. It will also make a big difference in your confidence. If you shrink your 20-yard groups, they’ll be smaller at 40 yards, too.

3.  Practice Properly

Practice is important, but the right practice is even more so. If you set out to shoot 50 arrows a day, do not shoot all 50 in one session, especially at first. If you haven’t been shooting every day, chances are you’ll get tired before you get to 30 arrows. Your form will suffer, which will open up your groups and increase the number of bad shots.

Remember, you are trying to simulate hunting conditions as much as possible. In hunting situations, you are not going to be shooting a bunch of arrows. You need one shot to count. It’s impossible to shoot 50 arrows like each one was your first. Better to shoot five sets of 10 shots over the day.
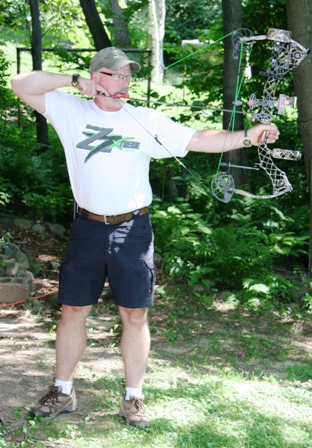
shoot-a-few-arrows-at-a-time-312x448

Shooting a few arrows at a time over the course of a day and week more effectively mimics hunting conditions than shooting a lot of arrows all at once. With every shot, focus on proper form.

With each shot, concentrate on your form and fundamentals. Take your time and as the days pass, proper form will become second nature to you as muscle memory helps your brain perform properly.

4.  Take Baby Steps, Not Giant Leaps

Don’t try to add 15 yards all at once. Add five at a time. As you become confident with the addition of five yards, add five more – maybe five a week for three weeks. I cannot overstress how important confidence is in your shooting.

Many things can go haywire in your mind. For example, if you notice that your pin is hanging up right below the bullseye and you have to forcefully move it up, you’re going too fast. Slow down. Relax. This should be fun, and it will be so much more fun when you see yourself making progress toward shooting great groups at longer distances.

5.   Don’t Overestimate Your Abilities

Now that you’re confidently shooting farther, it’s easy to forget the critical issues we talked about in steps one and two. Although you now have a 15-yard greater radius when setting up your hunting locations, you still have to factor in environmental conditions whether you’re hunting from a ground blind or a treestand.

Don’t take chances on alert deer. Keep in mind the effect uphill and downhill shooting has on your range. Remember that wind might play a trick on you. Anything that goes wrong at shorter distances goes even more wrong at longer distances. Trust your instincts and be ethical in your shot selection.

Wait for the right shot, and then make it count!


About Bernie Barringer:

bernie-barringerBernie Barringer hunts a variety of species in several states and Canadian provinces. He has published more than 400 articles in two dozen outdoor magazines and authored ten books on hunting, fishing and trapping. He is the managing editor of Bear Hunting Magazine, and blogs his hunts on his website www.bowhuntingroad.com.


Be sure to read more of Bernie’s writing here!

4,789 total views, no views today

Posted in Archery Hunting, Bernie Barringer, Big Game Hunting, Deer Hunting, Guest Writers, How To | Tagged , , , | Comments Off on Bowhunting: Add 15 Yards to Your Effective Bow Range

Dress for Success: 3 Steps for Coldwater Angling

By Darl Black

How to stay warm and dry while fishing in freezing weather!

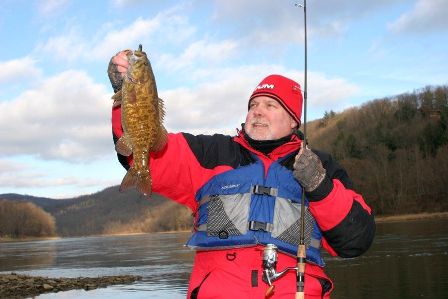
dress-for-fishing-success-448x299

During the late fall through winter in the cold weather regions of the US, fishing success depends on being comfortable in an inhospitable outdoor environment. Do you dress for success?

Fish don’t hibernate when cold weather arrives. In fact, several species bite better when water temperatures are in the 40s than they do in the middle of summer. If you want to catch walleye in a Pennsylvania river or pursue trophy smallmouth bass on a Tennessee reservoir during those chilly winter months, be sure to dress for success.

The three keys to remaining comfortable while fishing in the cold include:

(a) insulating clothing that holds warm air in but does not absorb water;

(b) outerwear which prevent rain, snow or wind from penetrating your insulation; and

(c) breathable garments which allow water vapor generated by body heat to escape.

Those properties vary some with each layer you wear, but the proper layering of today’s technical clothing can keep you warm and dry while fishing in freezing temperatures. When layering up, it’s as simple as 1-2-3 …

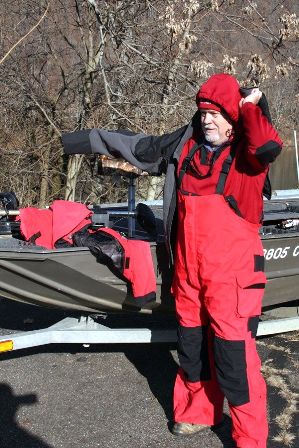
layering-proper-technique-299x448

During the late fall through winter in the cold weather regions of the US, fishing success depends on being comfortable in an inhospitable outdoor environment. Do you dress for success?

Step 1:  Placed next to your skin, the base layer wicks perspiration away from the body. Avoid cheap cotton thermal long johns which actually absorb moisture. Instead, purchase tops and bottoms of high-tech synthetic fibers which allow perspiration to pass through to outer layers.

Base layer options include somewhat loose fitting garments of hollow-core fibers and form-fitting compression garments. What’s the difference? Compression-type base layer garments have received widespread notoriety in recent years for active winter sports. But keep in mind that most cold water fishing is sedentary (standing in a stream or sitting in a boat) compared to walking long distances on a hunt. Compression garments may be the wise choice for hunting, but not necessarily for fishing.

Step 2:  An insulating layer has the space to trap warm air but at the same time allow body-generated perspiration in the form of water vapor to pass through. Again, man-made materials provide warmth and breathability without the weight or bulk of traditional wool or goose down.

Quality polar fleece is relatively inexpensive, readily allows water vapor to pass through, retains insulating qualities when wet, and dries very quickly.  Pullovers, zippered jackets, long pants, vests and hats are all available in fleece.

Step 3:  The outermost shell layer must be windproof and waterproof – yet breathable. Properly selected outer shell jacket and pants will prevent rain (liquid water) from passing through while allowing water vapor to ease out. If engaged in some moderate activity, it’s likely some condensation will form on inner clothing – but not enough to result in saturation of the insulating layer.

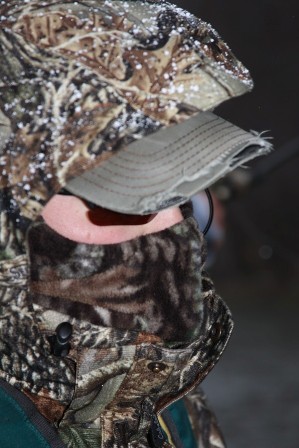
total-face-protection-299x448

Total protection package includes a neck gaiter, warm hat/cap, hood, visor and sunglasses.

Breathable high-tech materials include proprietary Gore-Tex®, Dry-Plus®, Tech H20®, Foul Tech®, Storm Dry® and likely some newer brands, too. Do not wear outerwear that has rubberized or PVC coating because water vapor will not pass through – you will sweat and soon become chilled.

Adjusting Your Thermostat

Some people can withstand cold better than others. You may require more or less insulation than your buddy in order to maintain the same level of comfort. If you are susceptible to being easily chilled (as I am), try doubling your insulation layer by combining a fleece jacket with a fleece or Thinsulate® vest. During extremely cold days, I replace my usual raingear shell with a Thinsulate insulated coat in addition to a fleece pullover.

Taking Care of Your Extremities

Keeping your head, ears and neck from becoming chilled is vital. The typical fisherman’s mesh ball cap does not cut it as cold gear. For a number of years, I’ve had a trusty fleece cap with ear muffs which is incredibly warm. An alternative is a fleece beanie with a separate headband visor. The bill of a cap or visor reduces glare on the water which, along with polarized sunglasses, greatly improves your line-watching ability and sub-surface vision.

In addition, I always wear a fleece neck gaiter which provides necessary neck protection and can be pulled up to cover mouth and cheeks, or pulled over the back of the head to create a hood. If the afternoon temperature warms suddenly, the neck gaiter can be easily removed in order to cool down a bit.

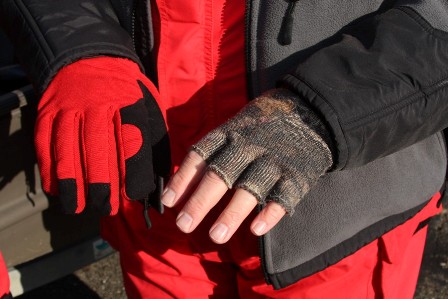
insulated-and-fingerless-gloves-448x299

Being able to manipulate rods, reel and line is vital. Wear insulated gloves when not actually fishing, but switch to fingerless gloves for the delicate work.

Keeping fingers warm enough to manipulate reel and line gets a little tricky. When not holding a rod, I wear a pair of full-finger insulated gloves for running the boat. However, when fishing, I switch to rag wool fingerless gloves, which exposes the finger tips. In extremely cold weather, I wear a pair of polypropylene glove liners to fish in – not as efficient as bare fingers for operating a reel, but better than getting frostbite. Although I have not yet tried the new gloves with “Data-Tip Touch Technology” in the thumb and forefinger, they may benefit anglers.

Be sure to carry the small chemical heat packs in each coat pocket so you can take a break from casting every 10 or 15 minutes and warm your fingers. If your insulated gloves are not waterproof, carry a pair of waterproof neoprene gloves for retrieving the anchor rope.

Don’t forget your feet! In addition to sock liners and thick insulating socks on feet, place small “toe warmer” chemical heat packs inside insulated waterproof boots. Be sure your boots are oversize to accommodate socks without restricting toe movement; being able to wiggle your toes is critically important to staying warm.

What About Special Circumstances?

full-face-protection-required-448x299

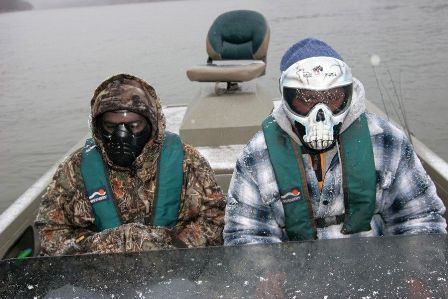
When running down the lake or river in near freezing temperatures, full face protection is required – even if you do look like something from a sci-fi movie!

When boat fishing: Full face protection is a must. A sports face shield may look like a prop from a horror movie, but it is extremely effective; drill out the nostril holes to allow heated breath to escape easier and treat the lens with anti-fogging spray. Another option is a thick balaclava hood with no-fog ski goggles.

When wading streams:  The uniform of the day includes thick neoprene chest waders coupled with polar fleece pants and chemical heat packs on the toes.

When ice fishing:  Ice fishermen generate a lot of heat when pulling a sled or drilling holes. Be sure to shed some of your insulating layers during these strenuous activities.


darl-black-head-shotAbout Darl Black:

A lifelong freshwater angler and veteran writer and photographer, Darl tackles a wide variety of fishing related stories for print publications and websites. Of all fishing, angling for smallmouth bass is his favorite pastime. He may be reached for assignment at darlblack@windstream.net.


Like what you’ve read? Check out more of
Darl’s writing here!

5,271 total views, no views today
Posted in Darl Black, Fishing Tips, Fresh & Saltwater Fishing, Guest Writers, How To | Tagged , , , | Comments Off on Dress for Success: 3 Steps for Coldwater Angling

Recipe: 3 Remarkable Rabbit Recipes

By John Jameson

Remarkable Rabbit DinnersWhile you may hear many people say rabbit tastes like chicken, the meat is slightly sweeter, and is one of the healthiest, leanest meats you can eat. It’s also environmentally friendly, especially if you hunt or even raise and butcher your own. Rabbit is a sustainable meat that isn’t grown on farms or produced in factories. What rabbit does have in common with chicken is that it is easy to cook and can be substituted into any delicious chicken recipe. Here are three great recipes for cooking rabbits.

Prepare the Rabbit

Before you are ready to follow any great recipes for cooking rabbits, you have to prepare the meat. It’s a good idea to wear disposable gloves to avoid contracting diseases that rabbits sometimes have (don’t worry, cooking the rabbit will kill the bacteria) and use a sharp knife. Remove the guts and skin, then remove the feet and head. Cut the forelegs from the body at the shoulder and cut the hind legs from the body at the hip. Finally, separate the rib section from the loin, and your rabbit is ready.

French Rabbit Stew

This is an age-old stew and one of the many great recipes for cooking rabbits that people have enjoyed for centuries. It is a delicious autumn and winter stew (although great for summer months as well) that pairs well with a glass of red wine. Here are the steps:
• Quarter the prepared rabbit
• Fry three slices of bacon in a frying pan
• Saute onion and garlic in the bacon grease
• Drain most of the grease, but leave a small remainder of drippings as well as the onion and garlic
• Pour this mixture into a large saucepan
• Cook rabbit, mushrooms and chopped carrots in grease in saucepan, saute over medium heat until meat is golden brown
• Add 3 teaspoons flour and stir to make gravy-like substance
• Add beef broth, red wine, thyme, parsley and bay leaves
• Simmer on low for an hour
• Add salt and pepper to taste
• Serve over mashed potatoes or noodles

Rabbit Casserole

While this is a favorite recipe for chicken, it’s also one of the great recipes for cooking rabbits. It’s an ideal family dish that most children love. Best of all, it’s easy and fast:
• Preheat oven to 350
• Grease a 9 x 13 inch pan with oil or butter
• Line bottom of dish with fresh whole-leaf baby spinach
• Sprinkle salt, pepper and your favorite cajun seasonings
• Pour 1/4 cup chicken broth over top of spinach
• Place rabbit over spinach, sprinkle with salt, pepper and seasoning
• Cover with diced tomato, mushrooms and green onion
• Sprinkle cheese and/or breadcrumbs on top if desired
• Cover with foil
• Bake for 20 minutes covered, 15 minutes uncovered

Beer-Braised Crock Pot Rabbit

This is a true hunter’s delight and tastes delicious after a day in the great outdoors. While it does take a little more time, this is one of the great recipes for cooking rabbits that everyone should know by heart. This is also great in a Dutch oven; simply follow the recipe then place the oven on preheated coals that you’ve placed in a dug-out hole. Cover with coals and cook.
• Put 3 peeled potatoes and carrots, 1 onion, 1 cup of mushrooms, 1 cup uncooked rice in a crock pot
• Leave out the rice if you don’t like the mushier consistency
• Season rabbit with salt and pepper, then brown in oil
• Put rabbit in crock pot on top of vegetables
• Combine 1 cup beer, 1/4 cup chili sauce, 2 tablespoons brown sugar and 1 garlic clove, pour over meat
• Cook on high for 3 1/2 hours, then check
• Serve with thick sliced bread and a glass of cold beer

What’s your favorite recipe for rabbit?
Be sure to let us know!

29,259 total views, no views today
Posted in Cook Rabbit, Rabbit Hunting, Rabbit Recipes, Recipes & Cooking | Tagged , , , , | 3 Comments

Duck Hunting 101

By John Jameson

10 Tips To Get You Started Duck Hunting

Waterfowl hunting can seem intimidating to the first time duck hunter. What equipment is needed, what type of shotgun and do decoys work? The art of duck hunting is not that complicated to master. The sport will however, take planning and patience. You will need to gather up some equipment and learn some fundamentals of the hunt. First thing you need to do is decide on a shotgun.

Duck Hunting 101 - 10 Tips To Get You Started Duck Hunting1. Experienced hunters usually go with a 12-gauge shotgun chambered for a 3-inch magnum shell. What is the best shotgun, semi-automatic or pump? Pump shotguns will never let you down. The pump will rarely misfire, and it is extremely dependable under any conditions. Semi-automatics on the other hand, fire as fast as you can pull the trigger, for some, this equates to more birds. Keeping on target may be a problem for new duck hunters using a semi-automatic.

2. Ammunition can vary by hunter, although lead shot should never be considered for duck hunting because of its toxic nature. Steel shot is very popular. The shot provides good velocity and impact. There’s also tungsten shot, and many claim it has the greatest impact. Why is impact important? Impact is what brings the bird down. You want your shot to have an immediate effect, and you want the bird to drop quickly. The standard three-inch shell with # 2 steel shot is recommended until you feel confident enough to experiment a little.

3. Decoys do work, birds are curious by nature and will always give any decoy the once over. Mallard decoys are probably the best to start with. They are all purpose decoys, and are an inexpensive way to get started.

4. Waders are needed; you will get wet retrieving birds. Chest waders will keep you dry even while sitting. Clothing is important, and it can make a difference.

5. Camouflage yourself and your blind. Landing waterfowl that spot anything amiss will not settle. Use face paint and wear long sleeved shirts. Hats, gloves and boots should all blend in with nature. Ducks can spot glare off any exposed skin, so make sure you are covered. They will usually circle a promising spot several times looking for any danger so be patient and don’t move until the birds are truly in range.

6. Duck calls for beginners, are they worth it? You will need plenty of practice however, before attempting a call. Although, scouting for a good location with proper concealment will net you plenty of birds. Ducks will respond to the right call. Practice is the only way to become an expert at calls.

Duck Hunting 101 - 10 Tips To Get You Started Duck Hunting7. Birds will land virtually on any body of water where they feel safe. First time bird hunters may assume that all duck hunting is at the lake’s edge. Birds can land in marshes, drainage ditches, water tanks and small ponds.

8. Keep in mind you can hunt only where it is permitted on public land, or where you have permission from private landowners. You will of course need the proper permits to hunt in any state. Hunting marshes and drainage ditches will make retrieving the birds easier. Many duck hunting enthusiast use trained retrievers for larger bodies of water.

9. Know your weapon’s range. Shooting at birds well out of range is wasteful and aggravating to other hunters. Birds beyond 40 yards are more than likely out of range.

10. Practice makes perfect. Get to the range and shoot some clays. Watch some videos on-line for great shooting instructions and then practice what you’ve learned. Better yet, take some shooting lessons. You’ll be amazed at how a lesson can improve your ability to consistently hit fast flying targets.

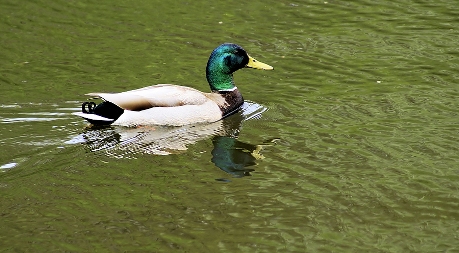
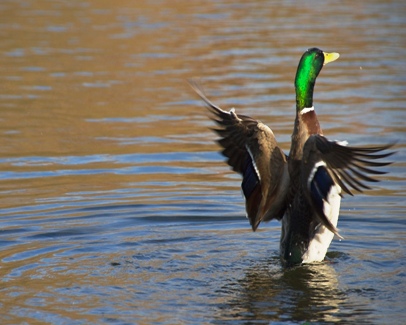
Most new hunters start out hunting Mallards, because they are the most recognizable. Some states have limits on the number of hen Mallards that can be taken in one day. Make sure you know the difference between a hen and a drake. Drakes have a bright green head. Make certain you know the difference between a Mallard and Wood Ducks, Pintails, Canvasbacks, etc., because the daily limits are usually different for each.


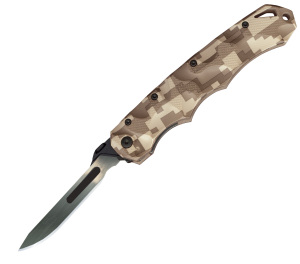
Check out the new Havalon Piranta Stag,
now available in green digital camo!
Click here:

Havalon Piranta Stag hunting and skinning knife green digital camo

8,904 total views, no views today
Posted in Duck Hunting, Guest Writers, How To, How to Hunt, Land & Water Fowl Hunting | Tagged , , , , | 1 Comment

7 Life Lessons the Outdoors Taught Me

By Tom Claycomb III

The outdoors can teach us
countless lessons —

here are 7 you shouldn’t forget!

Outdoor life lessons learned

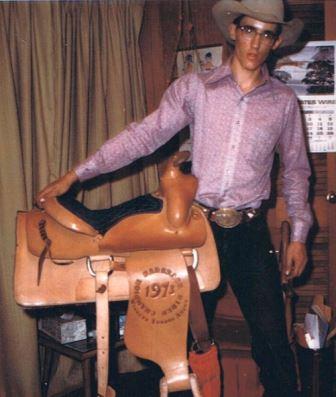
As a young rodeo champ, the author learned some good life lessons. (Photo: Tom Claycomb III)

How observant are you? Over the years I’ve witnessed a lot of things in the outdoors — and learned many of life’s lessons from what I’ve seen. Here are just a few, in no particular order.

1. Ever sneak up on a herd of deer and notice one doe that’s super vigilant? She’ll bob her head and stomp her feet — it’s maddening. If it weren’t for her warning the others and spooking them to take cover, I’d have made a million easy kills by now. (OK, maybe only a half million …)

What’s the lesson? The world has all kinds of dangers humans need to watch out for, too. Some threaten life, others destroy relationships. When I’m with my family and friends, I need to be more like that doe and notice danger when others don’t.

2. You’ve probably noticed when the big bucks fall, or when wary gobblers come running to a call. It’s when they’re chasing the girls. Back in ’73, I won the Bareback Champion saddle at the Winnett Indoor Arena. Hoyt Winnett took me aside and asked, “Have you ever heard of …?” and named a couple of great rodeo riders. “Yeah, everyone has!” I said. Then he asked, “Have you ever heard of …?” and named another rider. “No, never heard of him,” I replied. Then he said, “We started all those boys. The last one was just as good as the others, but women and whisky ruined him. You’ll do fine, Tom, just avoid the women and whisky.”

What’s the lesson? The habits that kill the mighty and majestic in the outdoors can do the same with men. I’ve seen many fall and lose everything since Hoyt gave me that sage advice years ago.

Little Jack fly fishing

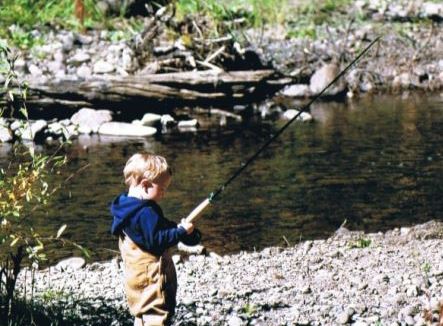
My best buddy Dude Kissel was fly fishing in elk camp. Unbeknownst to us, little Jack had been watching his dad and thought he’d give it a try. We think that’s cute, but that’s not the issue. The issue is kids are watching, so what kind of example are you going to be? (Photo: Tom Claycomb III)

3. Nowadays, everyone idolizes and indulges their pets, but not many years ago — before they reached this royal status — household animals were trained for a purpose. Have you ever hunted with a dog that ran 100 yards in front of everyone flushing all the pheasants? Ever have a dog run off so you spend the morning hunting for him? Have you ever been on a pack trip and had a horse spook, and wipe out a pack train? We had one spook and roll himself and two mules down the mountain into the river below. That horse ended up as bear bait.

What’s the lesson? An untrained animal is useless, maybe even harmful. It’s the same with kids. They won’t ever get a job or be productive in life if they aren’t conditioned to be productive. Training people or animals to be useful, disciplined and productive is just one way we show them love.

4. Donuts are like crack cocaine to bears. Habituate a bear to a pile of pastries and you’ll likely get a good shot. Grain is the downfall of horses. Approach a straying horse with a bucket of oats and you can probably catch him. A trapper knows the importance of bait. A mousetrap always has free cheese. Every animal needs to eat, and you can use food to gain control.

What’s the lesson? Yes, food is necessary for life, but if you can be controlled by your stomach you can be controlled by others. You don’t necessarily need to diet, but eating right puts you in control. However, this lesson is about more than food. Remember this — the better the bait, the worse the deal. Be wary of deals that are too good to be true.

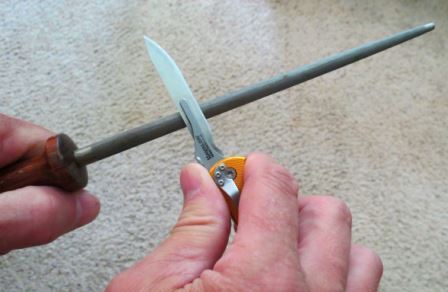
5. I do a lot of knife-related seminars at some of the major conservation organization conventions and sport shows. I’m always amazed at how sliding a knife’s edge along a steel produces such incredible sharpness.

What’s the lesson? The same is true of men. If we want to be our best we need to choose an inner circle, those we allow to get close to us and influence us, because iron sharpens iron. We’re better men when we respect the advice we’re given by trusted friends. (Brace yourself now — you might even need to listen to your wife!)

Iron sharpens iron - sharpening a Havalon blade

Iron sharpens iron. Even a used Havalon blade can be tuned up on a sharpening steel. Likewise, one man sharpens another, too. (Photo: Tom Claycomb III)

6. Does it make sense to throw your line into a trout hole and beat the water to a froth? Or to study the hole, see where the trout are feeding, what they’re hitting and how they’re using the current — all before you wet a line?

What’s the lesson? Don’t be impulsive. Give some thought to a new idea before you try it. Study new situations and come up with a game plan before you jump in. Not many situations in life turn out very well if you don’t approach them with a plan, even if your plan has to change.

7. There are seasons in the outdoors. Winter predator season. Spring gobbler season and bear season. Summer crows and varmints. Fall whitetails and elk. Then there’s morel hunting, and crappie fishing. Everything in its due time.

What’s the lesson? Life has its seasons, too. When your kids are small, maximize your time with them. That season will change soon enough — they’ll become teenagers and you’ll lose that special teaching relationship. You’ll have plenty of time for personal interests later.

Being outdoors with your kids can teach great life lessons

I’m sure people bond playing soccer or other sports, but the ultimate is being in the outdoors with your kid. Seek opportunities to be together — just you and them. (Photo: Tom Claycomb III)

Every outdoor experience offers lessons worth learning. What are some you’ve learned?


Author Tom Claycomb IIIAbout Tom Claycomb III:

Tom lives in Idaho writes outdoor articles for various newspapers, magazines and websites. If it’s something outdoors, he probably likes it. You can read some more of his writings at: www.Amazon.com, www.TomclayComb3.com, and www.BassPro.com.


Check out the new Havalon Piranta
Stag in desert digital camo —
available now! Click here:

Havalon Piranta Stag hunting and skinning knife in desert digital camo

3,837 total views, no views today

Posted in Guest Writers, Hunting Ethics & Education, Outdoor Life, Tom Claycomb III | Tagged , , , , | Comments Off on 7 Life Lessons the Outdoors Taught Me